Monday, July 30, 2012

Atlantican Warriors and The Nine Lives of Colonel MacDuff


To get my mind of ACW battles, I decided to paint up some more Atlantican warriors so that I can get on with some Toy Soldier games. A quick search revealed a need to do some casting but I did find two suitable bodies, 1 Prince August Skraeling, 1 Zinnbrigade 1900 Prussian. (who knew?). The first of these became one of the wild tribesmen from the interior. He has a trade blanket wrapped around one arm as a make  shift shield for close combat or to confuse enemy marksmen when darting from cover to cover, but has not yet acquired a musket. The other is a richer warrior from nearer the settlements who has a shirt as well as a musket. Both wear simple warpaint, mostly charcoal and grease.(and yes the Zinnbrigade Prussian pants are that tight.)

Looking at these lads and pondering game options for when I get a score or more done, I found myself wondering how well HofT will handle little groups of  5 or 6 which seems the natural way for these warriors to work, especially when raiding and ambushing. Will the 4 man fire groups be an issue? It also got me wondering how much I'll miss figure to figure melee for small actions and whether or not I could slot it in as an optional rule?  That's something that won't be answered until I try a game but I also found myself thinking how simple the ACW rules were that I had just used and how well they had worked; a lot like the early versions of HofT actually. Not that HofT is a complex set of rules but they try to cover so much now that I have trouble keeping them in mind (time for a Quick Reference Sheet) and during a game I am faced with minor unit tactical decisions as well as over all battle ones.  The two thoughts ran together and started me thinking about a simple set of skirmish rules or semi-skirmish rules for single figures which led me back to Macduff.  Since I had already done all the leg work for both approaches over the last 5 years, it only took a moment to jot down a one page version of a revised, simplified MacDuff.

The irony was immediately clear. I had started with an all purpose single figure game (MacDuff), then I had added a very simple element based game for battles (Morschuaser Meets MacDuff) while trying to simplify the main game. Then I transformed the simple battle set into a replacement all purpose game capable of being used with either single figures or stands (HofT), leading me to start work on a new simple element based game for battles to supplement the all purpose rules and to start thinking about a simple skirmish game.

So, the real question then is, am I really not able to make one set that works for all my horse & musket games? If that is the case, how many sets do I need, two or three? If one game isn't enough straight up, can I have a basic game with two variants that change the scale and shift the focus while keeping core mechanisms the same to make it easier to switch back and forth or should they be as different as possible? Oh my! Enough!

 The plan before I took that ACW battle detour was to try as big a CM scale battle as I can manage and also to play a small skirmish game. Before I forget how much I enjoyed the last 2 HofT games and waste more painting & casting time on fiddling with rules, I'd best get back on track and play those trial Hoft games. If they don't work, then it will be time to rethink the master plan.

Saturday, July 28, 2012

Bull Run - Trial by Fire

This morning I decided to finish out the game I had started without rewriting the rules to be more like HofT. In part this is because a question from Bluebear Jeff as to whether the game had been as much fun as a game of HofT  reminded me that the initial idea had been to play a CM Scale HofT ACW game, not to develop another set of rules (not that that wasn't a good idea.)   

Standard HofT games are aimed at Table Top Teaser type games, usually small ones. The idea here was to be able to fit most major ACW battles on to my table top and fight them out in several hours. The scale is such that I can fit, for example,  all of Gettysburg on the table (at least for either the 1st or the 2nd & 3rd days). The rules still need to be simple because the major battles will call for two to three times as many units as fielded for Bull Run and I suspect that it would take a fair amount of physical and mental energy to manage the planning and execution with that many entities.  But that's the point. Over the last two years I've been so busy resting and recuperating that I fear I'll lose the ability to do anything else so I think it is in my interest to occasionally trot out something requiring a bit more effort. (Only occasionally though not as my main thing!) That said, by the end of this game, it was starting to flow well so a larger game feels very possible.  Hmmm, I think when I rearranged  things to 1 stand per hex, the number of brigades ended up right but I may have short changed myself by a couple stands on each side. Oh well. 

So, how'd it go? 


Time to Skidaddle.

In brief, this game developed along much the same lines as the original battle, partially due to the starting first couple of moves and there being no decision to force the game to diverge, but also to the effect of the terrain and the rules that made co-ordinated moves very different given the organization, terrain, situation and the rules. The Confederates held their initial positions against the initial attacks by the Union 2nd Division. Given this success I brought Bee and Bartow across to support Evans as was done historically. For a short time I thought they might win the battle all by themselves but eventually numbers and persistence told and they were forced out of position and fell back to Henry Hill though in somewhat better shape than on the day. 


By then the 1st Division had forded Bull Run and the 3rd was mostly on line. After a short but damaging bombardment and several failed piecemeal attacks, a co-ordinated attack went in and seized the front half of Henry Hill. At just the wrong time (from their perspective) a series of low Orders dice made it hard for the Rebs to rally troops, bring up reserves and form a line. However, by the time the dice turned around they were in position to take advantage and launched a series of counter attacks. Casualties were heavy and I  thought they might break themselves against the Union line but they were fresh and  many Union units had suffered earlier and suddenly crumbled under the pressure. Over night I had decided to bring in a 50% army morale rule and the Union crossed it just ahead of the Confederates  and gave way; repeating history.


I have re-written the rules (available here as the Hexed General) to reflect what I ended up using and am quite happy with them. However, that CM HofT game still awaits. Techically each of the 4" on the table above is equivalent to 16" in HofT so even 10cm doesn't quite cut it. That leaves me two options, fudge the scale and play as is, or reset the table trimming about a foot off each size and making all the terrain features larger. If I do that, I'll probably get out my new cloth and lay it over the hills to see if I can pretty things up a bit. 


Why? Because I'm that anal over the scale issue? No actually, I've just been looking at Simon MacDowell's new terrain layout as seen in a refight of Schellenberg. A far cry from the standard issue ping pong table we used to play on in the basement of our college dorm/barracks. I'm not saying that my hastily painted cloth is going to match this  nicely painted and flocked table but  I may take a few days to make a table slightly less makeshift than the one I played on this weekend. Possibly change the battle while I'm at it. Depending on how things go and considering outside commitments it may be 2 weeks before I get the next game going and I won't promise not to get distracted by something other than 1/72nd ACW but I will get to it eventually.

The Hexed General


SIMPLE ACW ARMY LEVEL HEX WARGAME
By Ross Macfarlane 28 July 2012

  This is a simple game for fighting American Civil War battles on a hex grid. It is, in a sense, a development of the Square Brigadier and despite appearances, owes much to my experiences fiddling about with Bob Cordery's Portable Wargame. For those who don't like Grids, simple replace the word hex by "distance" with a distance being 4" or such other distance as suits you. A unit's fire zone is then  2 distances deep and 60 degrees left and right of straight ahead.  Feel free to add things or change anything you don't like.

A. BasicsOne hex = roughly 400 yards. 1 turn represents an average of around 20 minutes. Each hex can hold 1 unit representing an average of 1,000 to 1,500 men or 12 guns. All dice are 6 sided.
  
All units must face a corner of the hex. The 5 hexes in front of a unit (2 adjacent and the next 3 beyond these) are its front and its fire zone representing the effect of skirmishers, low level of artillery fire and long range rifle fire. The 2 hexes behind a unit are its rear.
  
Each army has a General who is in over all command. 

Each corps consists of a General (Corps Commander), a wagon representing the corps train and as many Divisions as is appropriate. Each corps must mark a hex where a road or railroad leaves the board or which contains a landing place on a navigable river which marks its line of supply (LOS). The train must be placed on a road leading to the LOS hex.

A Division consists of a Division Commander and as many units as is appropriate.

Independent units such as reserve batteries may be commanded by the army general until such time as he attaches them to a Corps.

B. Sequence: This game is played in turns. Determine who goes first in any manner you choose. This stays the same for the whole game. The player going first becomes the active player and rolls his order dice, then moves and shoots any units. The other or inactive player now resolves defensive close combat then the active player resolves close combat. Repeat reversing roles.

C. Orders: During the order phase, roll 1 die per General. The score on the die show how many Orders may be issued. A Corps Commander may only order units in his corps. The Army General can order any unit.

Ø     1 order is required to move, shoot or rally 1 infantry or cavalry unit
Ø     1 order is required to move, shoot or rally all the artillery in the corps
Ø      (Scenario specific rule for some late war battles: an extra order must be issued per unit to move combat weary troops adjacent to an enemy unit)
Ø     No orders are needed to move a General or Division Commander.
Ø     No orders are required to move, rally or shoot with a unit which is in the same hex as its Division Commander or which is part of a Battle Line or Road Column if the Division Commander is in a hex with one of the units.

A line of battle consists of 2 or more adjacent units of the same division, side by side. A road column is 2 or more adjacent units of the same division, one behind the other on a road.

D. Movement.
v    Open ground. Infantry or artillery may move up to 2 hexes, Cavalry or Generals up to 3 hexes.
v    Woods or crossing a fordable stream or other obstacle. All units may only move 1 hex if entering a woods hex or crossing an obstacle unless using road movement.
v    Roads. A road column or unit which begins on a road and moves its whole move by road may move double and ignore off road terrain but may not move into an enemy fire zone.
v    A unit may change facing as often as the player wishes when ordered even if it does not actually move. If it moves adjacent to an enemy unit it must face that unit. If adjacent to more than one it may choose which ones to face.
v    A unit may move through friends but cannot stop in the same hex. Any number of Generals and Division Commanders may occupy a hex with a unit.
v    Cavalry which dismounts is treated as infantry on the next turn. Dismounted cavalry which mounts is treated as cavalry on the next move.

E. Shooting. Infantry or Artillery which is ordered may shoot instead of moving or rallying. Artillery range: Heavy rifled artillery 9 hexes, Field batteries 3 hexes, Infantry 2 hexes. Roll 1 die per unit which has a clear line of fire to the target. Line off ire is blocked by terrain and by units of either side. One hit is scored for each 5 or 6 rolled against the target. A unit in cover ignores one hit from shooting each turn. A unit which receives more than 1 hit after cover has been considered, must take 1 hit but may immediately retreat cancelling 1 additional hit for each hex that it retreats. If meeting friends it may retreat additional hexes to pass through them.

F. Close Combat. Close Combat occurs if opposing units are adjacent after the active player has moved. No order is involved. The inactive player resolves combat including any enemy retreats and friendly advances then the active player resolves combat with any units that are still eligible.
v    Resolving close combat. During a player’s close combat resolution, roll 2 dice for each of his units that have an enemy adjacent to it and within its fire zone. If there are 2 such enemy units the dice may be split if desired. One hit is caused for each 4, 5 or 6 rolled.  If a target unit is in cover or is defending a stream or obstacle then it ignores one hit.  A unit which receives more than 1 hit after cover has been considered, must take 1 hit but may immediately retreat cancelling 1 hit for each hex that it retreats. If meeting friends it may retreat additional hexes to pass through them. If all adjacent enemy units retreat, a unit which scored at least 1 hit may advance into one of the vacated hexes. Cavalry which advances may resolve combat again but may not advance again if the enemy retreats.
v    Commanders in close combat. If a commander or General joins a unit in close combat he adds 1 die but if that die rolls a 1 or if a commander or General is adjacent to an enemy unit during the close combat phase and is not co-located with a friendly unit then he has been wounded or captured and is removed from the game. A replacement will take over at the end of the player’s next turn. Place him as desired.

G. Morale. Hits are a mix of casualties, fatigue and a loss of cohesion. When a unit suffers too many hits it ceases to be effective and is removed from the table.
v    Hits. Units are removed if they take 3 hits.
v    Rallying. A unit with 2 hits may Rally if it is not in an enemy fire zone and does not move or shoot. Roll 1 die +1 if joined by a General. A score of 4,5 or 6 removes 1 hit.

Victory.  In the absence of any other victory conditions, if at the end of a turn, if the infantry and cavalry units that have been lost equal 1/2 the number of infantry and cavalry units that the army began with, the army must concede defeat. If a corps’ LOC is occupied it counts as a unit lost as does the Corps train if captured.

If playing a multi-day battle. Each side may make 1 night move but may not move adjacent to the enemy or bombard.  Roll again for orders and 1 hex may be entrenched for each order rolled. After 1863, 2 hexes may be entrenched for each order rolled.


Chance cards may be used to introduce random events, General’s being wounded, weather, and so on.

Friday, July 27, 2012

Bull Run - Interim Report

After several hours of hard fighting the Rebels have finally been pushed back onto Henry House Hill 

The changes proposed in the last post helped a lot but the number of dice was an issue and assault combat still didn't feel right so I thought a while and reset the game again. This time, I tried the following:
______________________________________________________________________
1 PIP die for each Army or Corps General, in this case 1 per side.
Each other General gets 1 PIP to use on his own troops, + what the General shares.
1 PIP to move or shoot with 1 unit or battleline.
2 PIP if no General within 3 hexes.
Each turn is 15 - 20 minutes. 

Artillery may shoot with 2 dice at up to 3 hexes or move or rally
Infantry may shoot with 1 die at 2 hexes or move.or rally
Any unit adjacent to the enemy fights with 2 dice for all units. No PIP needed. Non active player rolls first then the active player.

Shooting: @ 5,6 hits.
Assault: @ 4,5,6 hits.

If shooting at Cover or if attacking uphill or over an obstacle in assault: cancel 1 hit per attacking unit.
Infantry and artillery can take 3 hits, cavalry can take 2.

A unit taking more than 1 hits must take at least 1 but may cancel 1 additional hit for each hex they retreat 

Rally. A unit not in an enemy fire zone may try to remove a 2nd hit. 4,5,6 to remove. +1 if general present.
A unit cannot remove the first hit.
___________________________________________________________
That worked much better and gave an interesting, fairly fast paced game with reasonably believable results.

However, I'm not sold on PIPS or the straight Igo-Ugo. I have tried PIPs a couple of times in the past and they do have an attraction as a game mechanism but they can have a big negative impact without explanation. Plus the turns seemed to rattle back and forth so fast when pips were low that it was hard to keep track, it all became a blur.

One option I am thinking about is to use the card activation system from the current Hearts of Tin with 1 card per General + 1 card per 3 units + 1 joker (chance card). That way the game is interactive but if scattered an army will not be able to activate every unit every turn and the general will have to choose.

I also couldn't help but think while the grid was convenient, a non-gridded game would make it easier to adjust the strength of Brigades.

But I'm done for tonight. I'll decide tomorrow whether to finish the PIP game or reset a 3rd time and try the cards.  At least I'm happy with the combat system now.

Beginning Again - Not Quite Bull Run (Amended)

I remember now why I do more "inspired by" games than actual historical refights; its a lot of of work!  I've also seen some light as to why I was such a lousy navigator when driving a minesweeper around the Channel Islands on the coast of BC and have increased respect  for cartographers.  However, after nearly 5 hours of mapping, table setting up, delving through Orders of Battle and re-reading parts of accounts of the battle, looking for start times and positions, and sorting troops, the table may look crude and improvised, but its ready!  


The first picture zooms in on the area where most of the fighting took place. The core of this is the area used for the Battle Cry scenario but set up as of 9 am, just before the first shots were fired by Evans Brigade.


The second picture shows the whole table top. covering an area of roughly 4 miles by 5. There has been SERIOUS fudging of details of winding streams, hills, roads and woods but I think the main details are right enough for my purposes. I am going to have to do some checking out of chalk , poster paints etc as it would have been sooooo much easier to just draw or paint the streams, roads and wooded areas on, especially with squares as a guide though once I had gridded my layout map into 4" squares, using the hexes to fine tune placement worked pretty well. Having a lot of small hill pieces that could be put together would also help. Sounds like work, maybe after I remodel the old pole-barn garage into a  workshop. Only a year over due on that one.


I was going to base the troop dispositions and strengths on the Courier article but it was one that I had clipped out during one of my "gotta make more room on the shelf" phases and the table with arrival times and locations didn't make the cut. The scenario didn't specify which of the two F&F scales it was using either so, since I already had Battles & Leaders out, I stuck my head into it. Then I looked back at the rules, the number of figures/stands I had pulled out and the last minute revised ground scale. I also pondered the lack of Corps and in the Confederate Army, the lack of divisions,  not to mention the post-war memoirs battle between Johnston and Beauregard over who was in command.    


Earlier today I had revised a copy of the rules to work without a grid. It didn't take long since it was mostly a matter of multiplying all distances by 4 and referring to inches and zones but I had did have to revise the combat so that units will target a unit rather than a hex. this is something I had been considering anyway after the Ferryman's comments the other day. Once I went back upstairs to clear the first lay out away, I decided to give the hexes a go after all. Since there were less than 10 brigades on each side, I considered going back to my original thought of 2 stands per brigade with only 1 brigade per hex but digging into the OB's got me thinking again about the uneven size of brigades. I also considered Division commanders again. If I made them equivalent to Corps Commanders, each would only have 2 to 4 units, not enough. If I didn't, the Union would have 1 General to command the whole army including some units which would be 5 feet or more away and thus at double points distance. I finally decided to add Division Commanders in for this battle at least, and to field 1 stand per 1,000 men ignoring Brigades.


For the Union this gives me an Army General and 2 subordinate Generals, each with 8 stands on 1 corner of the table and a subordinate with 5 stands on the far side. A little command heavy perhaps but workable at least. For the Rebs I decided that both Confederate Army commanders can use PIPS on any Confederate unit since that's they both seemed to have given orders to each other's brigades on the day. That gives me 2 Generals, one with 11 stands and one with 10, all intermixed  and scattered across the table but all able to be ordered by either General.


The change to the combat will be that each unit (stand) will target 1 enemy unit (stand). The die modifier for cover will apply to each firing unit. (thanks John). All firing will be done before the effect is determined.


To see if the rules have any validity, it would be best to attempt to follow the original battle moves   to see if they are even possible but that would require more studying, note taking and cross referencing to build a script to follow and a timeline and list of benchmarks to check against. Instead I will test the rules to see if they are any fun regardless of validity. So, no script! Once the first shot is fired, both armies are free to do as they see fit. (I suspect I may follow the early moves anyway and Jackson at least head for Henry Hill,  hoping for a chance to stand like a Stonewall and earn his nickname. Sure hope he doesn't end up Jelly-legs Jackson!)


_____________________________________________________________________________
***** That didn't take long!**** 


It took a turn and 1/2 to realize I didn't like the flow of the game. I was about to throw the whole thing out when I realized that the major issues were all around  the 2 units per hex. So I made all brigades 2 stands and reset the game. I also decided that the revised combat would allow me to do reduce the penalty for activating in the enemy fire zone and instead let infantry fire 1 die at 2 hexes if they don't move, uppig artillery to 2 dice. I've also added a "take the ground" rule for assaults.  I'm now abut 5 turns into the game and its flowing well. Report tomorrow.

Thursday, July 26, 2012

How to not Start at the Beginning

I was rather expecting a few hours of gaming time today, being my birthday and all. Didn't happen but I got a start on setting up the table. Since my mind was on civil war battles, what with the proposed rules and all, I thought I should try one. Not having a better idea, I decided to start with Bull Run since it was the first battle and thus a good starting point. I have a Fire & Fury scenario published in the Courier years back, Vol 1 of Battles and Leaders and there are maps & OB's a plenty on line. I settled on printing one out from Wikipedia, made a scale table size cutout, traced my table on to the map, added a scale 12" grid and set to.

Now it had been another hot day, I was quite tired before I began, and I had mistakenly repeated my morning insulin dose so my blood sugars were on a bit of a roller coaster with the usual affect on mental abilities.  (given the last bit I should probably have skipped the celebratory glass of Propellor Special Bitters while I BBQ'd a bit of one of my niece's ex-pigs...but...). Anyway, I set to to translate the complex terrain from scale 1 foot squares on the map to 4" hexes on the table.  I began with masking tape streams at which point I realized that I hadn't done a good job of placing the template so I tried again. (should have quit at that point). Bull Run itself was a bit wonky, especially where I cut out a loop that ran off table but over all it was ok. 


Then I started on hills. Ah, yes well, if I had had a big stack of 4" hexes to build hills out of this would have been easier, especially if the map I was using wasn't just a bit vague on hill shapes. (The high ground was shaded but no contours were added and thus various famous hills were run together.) OK, I thought, I'll grab the Fire & Fury scenario map and use the hills from that. Of course this showed a table marked with what would be a 12" grid for F&F but were 6" squares in a corner of my table. It was while I was trying to match the 6" grid to 4" hexes that I noticed that the map didn't match the other one I using, even allowing for the alignment being about 45 degrees off. Add in the various misfitting hill shapes I had available, and it was all going south fast but eventually I decided to move onto roads and woods. Things got even wonkier and the disagreement between maps got worse. Eventually I broke out Battles & Leaders to look at the 3 maps in there. Yup. Parts of the scenario map had been twisted two points west, presumably to make the scenario fit better but none of the 5 maps I now had in hand quite agreed with each other!  One thing was clear though, the way my table was headed, a bunch of troops would still start off table while 3/4 of the table was unused. That hadn't been the plan! 


After briefly wondering why I hadn't just thrown a well tried Grant Teaser onto the table and broken out HofT, I decided to call it quits, clear the table tomorrow and start over.


If this hadn't been meant as a quick, casual one off game, I would have done the usual legwork to draw up a simplified map of the table and used that to guide the set up rather than working from a small complex map. Somewhere I have sheets of hex paper left over from eons ago, one of those would probably be quite useful. The lack of pre-cut hex hills is still a bit of a problem though not a show stopper. It is tempting though to scrap the hexes, rewrite the rules, buildup the contours, throw my painted canvas over the top and then add streams roads and woods. Adding a subtle grid of squares to the cloth would be easy enough and would require minimal rules tweaking, going grid-less  would be even less work but the combat rules would need to be tweaked and distances converted to inches and virtual zones. But it would be nice to test them and even without a hexed scenario map, a clear table layout will be easier to deal with. But not tonight.


Monday, July 23, 2012

The Product of a Fevered Brain.

The initial draft of these rules has now been recalled and the revised set set may be found here:
http://gameofmonth.blogspot.ca/2012/07/the-hexed-general.html

_______________________________________________________________________________
SIMPLE ACW ARMY LEVEL HEX WARGAME
By Ross Macfarlane 23 July 2012
(with a few minor corrections)
A. BASICS.  This is a simple game for fighting American Civil War battles on a hex grid. One hex = roughly 400 yards. 1 turn averages 1/2 hour. Each stand or group of figures is a unit. A unit is either; a brigade, averaging 1500 men or  artillery batteries totalling 12 to 16 guns on average. Up to two units can be in a hex as well as 1 or more Generals.

All units must face a corner of the hex. The 5 hexes in front of a unit (2 adjacent and the next 3 beyond these) are its fire zone representing the effect of skirmishers, low level of artillery fire ( a few guns attached to brigades etc) and long range rifle fire.

All dice are 6 sided.

Each army has a General who is in over all command.  

Each corps consists of a General (Corps Commander), a wagon representing the corps train and as many brigade and artillery stands as is proper. Each corps must mark a hex where a road or railroad leaves the board or which contains a landing place on a navigable river which marks its line of communication (LOC). The train must be placed on a road leading to the LOC hex and be within 6 hexes of all units in the corps at the start of the battle. (or as agreed upon) Independent Divisions may be treated as a Corps.

Independent units such as reserve batteries may be commanded by the army general until such time as he attaches them to a Corps.

B. Sequence: This game is played in turns. Determine who goes first in any manner you choose. This stays the same for the whole game. The player going first becomes the active player and rolls his activation dice, then moves any units, then resolves any bombardments. The other or inactive player now resolves combat then the active player resolves combat. Repeat reversing roles.

C. Activation: During the activation phase, roll 1 die per General. The score on the die are Activation Points or pips which indicate how many units can be activated to move or bombard. A Corps Commander may only activate units in his corps. The Army General can activate any unit. The numbers of activation points required for a give activity are as follows:

Ø     1 pip is required to move 1 unit or a line of battle or a column or an unattached General.
Ø     It costs 1 extra pip to move an infantry or cavalry unit, or line of battle if it begins its move in an enemy fire zone. (Scenario specific rule for some late war battles:  +2 pips for combat weary troops.)
Ø     1 pip to bombard with artillery that does not move.
Ø     The number of Pips required is doubled if General is more than 3 hexes from the unit or from the closest unit in a Battle Line or if he cannot see the unit being activated.

A line of battle consists of 2 or more adjacent units of the same corps, side by side with the same facing. A column is 2 or more adjacent units one behind the other on a road.

D. Movement. Infantry or artillery may move up to 2 hexes, Cavalry or Generals up to 4 hexes. A train may move 1 hex. A unit may change facing as often as the player wishes when activated even if it does not actually move. If it moves adjacent to an enemy unit it must face that unit. If adjacent to more than one it may choose which one to face.

A column or single unit which begins on a road and moves its whole move by road may move double but may not move adjacent to an enemy unit.

Unit must stop if entering a woods or other difficult terrain hex, crosses an obstacle such as a fordable stream or if it moves into a hex in an enemy fire zone. Any remaining movement is lost.

Artillery and Trains may not move adjacent to an enemy unit.

E. Bombardment. Artillery which is activated but which did not move, may bombard. Artillery range: Heavy rifled artillery 9 hexes, Field batteries (12 pounders and rifles, lighter guns are included in with Brigade fire) 3 hexes. Roll 1 die per artillery unit bombarding a given hex. There must be a clear line of sight from the artillery to the target.  One hit is scored for each 5 or 6 rolled. The owner of the units in the hex may assign them to units in the hex as he chooses. The effect of hits from bombardment is the same as the effect of hits on combat.

F. Combat. Combat occurs if opposing units are adjacent. During the inactive player’s combat phase, all units which have an enemy unit adjacent and in their fire zone, must resolve combat. No activation is involved. Roll 2 dice per unit against the target hex. 1 hit is caused for each 5 or 6 rolled Subtract 1 from each die if the enemy is up a steep hill. The owner of the target may assign the hits to the units in the hex as he sees fit after all dice are rolled.    
Ø     1 hit on a unit = retreat 1 hex or take a Heavy Casualties marker.
Ø     2 or more hits on a unit = retreat 1 hex and take a Heavy Casualties marker.
Ø     Cover negates 1 hit per unit. (woods, town, entrenched etc)
Ø     A unit which takes a 2nd Heavy Casualties marker is removed from the table.
Once all of the inactive player’s combat is resolved and the effects carried out, all active units which have an enemy unit adjacent and in their fire zone, must resolve combat. No activation is required. The process is exactly the same as for the Inactive player.

Victory.  In the absence of any other victory conditions, when both sides have had enough or when 20 turns have been played, tally victory points.  Each side counts 1 point for each enemy unit with a heavy casualty marker and 2 points for each unit destroyed or forced to retreat off table. Add 1 for each remaining enemy unit in a corps which has lost its train or whose LOC hex is being occupied. The side with the most points wins. The degree of victory may be determined by writing a report on the battle and consulting the opinions of those who read the report.

Chance cards may be used to introduce random events, General’s being wounded, weather, and so on.

If playing a multi-day battle. Each side may make 1 night move but may not move adjacent to the enemy or bombard.  Roll again for PIPS and 1 hex may be entrenched for each PIP rolled. After 1863, 2 hexes may be entrenched for each PIP rolled. 

Reading can be dangerous to your sanity

A couple of years ago I read US Grant's Civil War Memoirs and the campaigns leading up to Vicksburg left me with a prolonged itch to fight an operational level ACW game pushing divisions and corps about. A mini-campaign on a table.  Eventually this faded to a faint background itch.

So what have I done now? Now I'm reading Sherman's Memoirs.  (Available free from the Gutenburg Project for those who don't mind reading electronic media.)  To my mind this is an even better memoir even though the civil war is only part of it. He seems to go into more detail and does a better job of explaining why  he did various things and how things happened, how the battles were fought and so on, including lots of personal vignettes as well as copies of official reports, orders and letters.  He even manages to make the near siege of Atlanta interesting. Previously I saw this primarily as two entrenched forces sniping at each other with the occasional pointless assault. Now it makes sense and has exciting decisions and problems if you go high enough and wide enough.

All of which would be bested handled as an  old fashioned  map campaign with lots of details and paper work with supplies and raids and with battles fought on tabletop. I know where I could steal some ideas to start with but I'm not ready to go there this year. The smaller actions, and there are many of them, especially along the lines of supply, are suitable for conventional wargames but the major actions with a front of miles need something a little off the beaten track though Volley & Bayonet using the half scale and a large table could work.

It is tempting though to think about something a bit different. My mind comes back to something Portable Wargame inspired with 1 stand = a brigade, activation pips perhaps by Corps and 1 turn= an hour or maybe 1/2 hour  with night turns of 8 - 12 hours depending on the season so that multi-day engagements could be fought. The simple 1 die roll combat would be either ranged representing a mix of artillery and skirmishers to basically pin and engage the enemy or an assault which could destroy units or force retreats. LOC and supplies would need a role as would generals.The sort of thing where one probably ought to use 6mm or smaller figures, maybe 10's but which will have to make do with 20's since I've sold most of my 15's and I'm not starting an ACW collection in a 4th scale (1 man 54mm Brigades on a map might be an idea though since I have lots of those.)

  I'm up to the March To The Sea so hopefully I can soon put this back out of my mind and onto the back burner. Probably best if I don't start on the Second Sikh War book that I waiting. Its in that same operational realm. Perhaps Experiences of an English Volunteer in the Mexican War will be closer to the mark and less distracting.

Sunday, July 22, 2012

89th Foot Out of the Goo


Scruby 40 mm 1812 figures with a home made officer.

Here at last is the first 20 man battalion of shiny toy 1812 figures. I was toying with using the Charge organization with a stand of colours per "Brigade"and with the drummers not counting but have decided to go with 16 privates, an Officer, Sergeant (corporal here), Drummer, Ensign  for a total of 20, all counting.

The privates are listed as US infantry on the Historifig site but they have British packs and Shako's so I have painted them as British.  There was no officer, so I took my officer figure, the original in shell jacket, slimmed him down to fit, added coat tails and modified the pose to have the sword arm lifted. For maximum compatability, rather than changing the forage cap into a Belgic shako, I used one of the Scruby heads.

Once he was as ready as he was ever going to be, and ensconced 1/2 way in Plasticine,  I opened up my rtv  Silicone to make the mold and #@%#@%$#@%$!!! instead of being liquid, it was the consistency of silly putty. I'm not sure if I some how let a minute amount of catalyst into the can or if was temperature or?  This was the first (and last) can of the Alumalite brand that I have purchase. After an intitial wave of dispair, I scooped out a quantity and added catalyst. It was too thick to stir so I kneaded it together and pressed it over the master.  It normally takes 6-8 hours to set but only about 20 minutes this time. Stil lit seemed ok so I flipped him over and did part too. 

The detail is not exactly sharp but I've done much worse, and there are no air bubbles! His pointing finger was lost but even the sword almost came out!


Home made officer (also used as ensign with colour in right hand), private converted to drummer, original Scruby private. (Of coursefor the photo I picked probably the only one where I missed filling the arm plug.) The drummer is just a private with the musket cut off, drum added and arms tweaked a bit.  

Tuesday, July 17, 2012

Return to Crysler's Farm : The Game

The troops were deployed in roughly their historical positions, everything was set, the starter's gun went off and the first card flipped. The game was on!
As the American columns struggled through the woods, I suddenly remembered that a while back I had reinstated the  ability of a Brigadier to join a unit and add a d6 of movement to his troops. That helped! At least it did until Brigadier Covington led a column out of the woods and into a hail of fire from the gunboats.
(That's him in the middle, on the horse, lying down amidst a pile of bodies)

In the woods, the American columns pushed the skirmishers back relentlessly, but slowly. The problem is that the Canadians and Indians kept ambushing the American columns, trading shots then fading back into the woods. Since a unit has to be able to see the enemy before charging, the Americans were forced to repeat the process, turn after turn, slowly wearing their enemy down and slowly but relentlessly pressing them back while looking for a mistake or a bit of luck to give them an opportunity to get to grips. Eventually it came and they activated while the lights were in view, a crashing volley followed by a charge drove the light troops back shaken. The right hand regiment pressed on to make sure the enemy didn't come back while the left hand regiment wheeled towards the open British flank.


Despite having penalties, the flanking fire from the gunboats was a serious thorn in the side of the American advance. Numbers told however and before long the British detachments on their right were forced to fall back in a hurry to avoid destruction. Morrison himself galloped over to rally them. Alas he stayed a little too long and eventually a long range shot from the US field gun laid  him low.


In the absence of Morrison, the acting commander of the British infantry (I'm not using his name, I'm too embarrassed, didn't even use a die to choose an action and shift the blame) made several bad decisions. The first, no doubt  a reaction to the firing in the woods which was level with the flank of the British line, was to wheel back 1/2 the 49th Foot to face the woods just as was done in the historical action. So far so good but the Americans in the woods were at least 2 turns away, the Americans advancing across the field were only the next card away. Oops! No problem, I still had a couple of dice of reaction fire, no hits. OK well the 89th can fire at long range, 1 hit, ok, brace your self, ouch! 3 hits!  Oh look, the American flank is open, what were they thinking?  I'll just wheel the 89th forward and Damn! they wasted their fire at long range. Oh well, maybe they'll get first fire next turn? Not a chance. Black card, the Lafayette Volunteers unleash a volley into the 49th and then start wheeling their flank back. 4 dice, 4 hits!OUCH! The British unleash their fire, 7 dice, 1 hit? Eh? The powder must have gotten wet! Oh well, wet bayonets still work, I sent the 89th forward and they chased the Americans off with cold steel. All's well again, sort of.

Even better,  a chance card  brings an unexpected unit of Canadian local defence militia onto the field!

Left on their own, the 49th fall back to rally but resolutely refused to recover any hits. No shirkers here, the hits must be all dead and wounded! Behind them, the artillery commander is wondering why the 49th didn't fall back far enough and a bit to the side so as to clear the line of fire of his gun? Sighhh. Luckily the light troops have rallied and are doubling over to support the 49th.

Out of the woods comes the next regiment of US Regulars and the British powder is still wet.  The Americans fire and then on the next turn lower bayonets and charge. If the British lose they will be broken. Incredibly, neither side scores any hits and the Americans fall back an inch and resume the firefight.


Its down to the wire. Several American units are shaken and one of the guns has been destroyed by the gunboats but the British have suffered heavy casualties as well. There is only 1 red card left in the deck for this turn, I decide to use it to order the newly arrived militia to support the 49th but oh damn! a joker,  a chance card its. ... A Blunder! The ordered unit does something other than what was ordered. Ok 5,6 they storm down the road toward the American Dragoons, 3,4 stand still, 1,2 back the way they came. Not surprisingly, up came a 1 and off they go. Thanks for showing up lads, however briefly, no wonder  there is only passing mention of the militia in the history books.

Next card, a volley sends the 49th Foot reeling back shaken but the gunners have been waiting for this and release a boxcar full of grape on the Americans. The light infantry close in on the flank, fire and the Bluecoats are running.  The Layfette lads are rallying deep in the woods, and the last almost fresh regiment is floundering through the woods farther ahead, looking for the way out. Like so often, including the historical action, there is only one unit left to stop the  advance of the 89th. The Dragoons. They have crossed the gully and wheeled. With rallying enemies to one side and the cavalry to the other, the 89th wheels back as they did on the day and wait. The trumpet blows, the Dragoons ride forward, the muskets crash and 1 sole Dragoons flees across the field. The battle is over. 

I really need to dragoon a live opponent into playing this battle with me again. This makes at least 6 times I've played this battle over the last 8 years, once with MacDuff, 5 times with HofT/Morschauser Meets MacDuff, once with Portable Wargame. Five times solo. Every one a squeaker but every one a British victory. Maybe I need someone else to take the British?

Anyway, the limited number of cards didn't have a huge impact on the game but I liked it. A chance card was pulled every turn but one, but because of the dummies only 3 or maybe 4 actual events happened. None of the events had a crucial impact but the arrival and subsequent departure of the militia was cruel in a fun sort of way.  Technically there was no connection between the 2 events but one can't help but picture the fates chortling in a  corner. The British were just glad that they pulled the card. The arrival of a regiment of US regulars representing the boat guard arriving slightly earlier than their historical counterparts might have tipped the balance.

I'm going to carry on editing over the next few weeks,  looking for poor language, mistakes, typos, missed edits and especially, areas where the rules don't accurately reflect actual practice. (yes I catch myself now and then doing things "wrong" and then have to decide whether the rules are right or I am. Usually its me. :)  I am also starting to think about the design notes and trying to think which aspects of the rules haven't been properly tested. I think it may be time to plan that house to house city fight that Jeff asked about.


Monday, July 16, 2012

Return To Crysler's Farm - Set Up

Why? A legitimate question.  I did play the battle 5 times last year with 3 different rule sets but that's the point really. It has become a bit of a benchmark for gauging how well rules work. Its also a well balanced, TT Teaser sized historical battle in a period that I have troops for.

It might not be obvious from the glossy toy soldiers and the prevalence of fictional wargame campaigns/armies on my blog but there is still a part of me that wants to maintain at least the capability of staging historical battles of some sort. Partly this is because of my interest in the historical side of the hobby, including the actual history hidden behind fictional settings, but I suspect it also a desire for some whiff of "legitimacy" as if there were something wrong with  playing non-historical wargames.

Recently I took a good look at the possibility of doing a Battle Cry or Portable Wargame version of the war with 4 or 6  man units on a hex grid.  My reluctant conclusion was that such a thing would probably be play tested once and never seen again unless perhaps it was done as a very portable game in a box using 20mm plastics and actual Battlecry components including maps and terrain tiles.

Luckily, having decided that my fictional games will work just fine with many fewer figures  than my original plans called for, it seems there is still room for a compatible 1812 project capable of covering any of the battles on the Canadian or Western Campaigns. The question was if the latest (last? maybe?) version of the Hearts of Tin rules work as well as I anticipated for the War of 1812?

(Not to mention that I was so excited after the last game that I couldn't wait to play another.)

 Starting positions.

In keeping with my new resolution to put the "Game" back into Wargame, I made some changes to the OB used in past games, especially the most accurate one, that used in Feb 2011.  This time, using a ground scale of 1"=25 yards and 1 figure ~ 20 men, I took the historical numbers by Brigade, divided by 20 and rounded it off to proposed standard wargame units (18 inf, 9 lt inf or cav) except that I reduced the 150 cavalry slightly  to 6 figures rather than rounding up to 9. Whether this was to reflect the number of horses withdrawn to help pull guns, to avoid over stating their potential or merely an error, I can't say. The 18 line infantry and 9 cavalry were inspired by Charge! organizations but it occurs to me belatedly that I don't really need to conform to Charge! and that counting figures is  much (MUCH) easier on my brain when units are in multiples of 10. 

After the game last year I speculated that it might have been more accurate to downgrade the tired, sick US soldiers than upgrade the British ones but, since the American soldiers fought well, I didn't go there.

With a bit of fudging this gave me the following OB:

British.
General: Col Morrison.
49th Ft (played by the 41st) 18 Elite Infantry (Sash & Saber)
89th Ft (in person) 18 Elite Infantry. (Scruby)
Flank Companies and Fencibles (49th+militia) 9 Elite Light Infantry (Sash & Saber)
Voltigeurs and Mohawks (played by 7 militia + 2 Mohawks) 9 Elite Light Infantry + Commander (Maj Heriot) (Perry + Prince August conversions)
Canadian Light Dragoons (played by GGBG) 1 Regular Cavalry figure. (Zinnbrigade conversion)
1 field gun with 3 crew (Zinnbrigade conversion w S&S gun)
1 gunboat with heavy gun and 4 crew. Due to the height of the banks all  fire from the gun boats counted as obscured. (S&S conversions)

US.
To reflect the poor performance of Boyd, he was not represented on the table.
1st Brigade: Brigadier Cole + 1 x 18 Infantry (John Bertolini's original figures)
3rd Brigade, Brigadier Covington + 2 x 18 Infantry (S&S conversions + Scruby)
4th Brigade, Brigadier Swartout + 2 x 18 Infantry (S&S conversions plus my own originals)
2nd Dragoons 6 Regular Cavalry (Played by NY Dragoons) (Zinnbrigade conversions)
Artillery section: Field gun with 2 gunners (Zinnbrigade conversion w PA gun)
Remainder of battery: Field gun with 4 gunners showing up mid-battle. (Zinnbrigade conversion w PA gun)

Each Brigade had one  flag as a morale marker which I removed if the Brigade became shaken.
I gave each unit a drummer/bugler which I placed in front of the unit at the start of each turn and placed behind it when the unit was activated to help me remember. I actually owe this idea indirectly to Bluebear Jeff who uses the position of the colour bearers to indicate morale status.

In order   to place an additional strain on players, more from a "making the game fun" angle than from " increasing the friction to make it more "realistic"" angle, but accomplishing both imo, instead of an unlimited card deck, I placed 1 card per 2 units plus 1 per commander. This means that unless a player formed his brigades so that several units could be activated as one,  he would not be able to activate every unit every turn. Worked like a charm.  

For chance cards I included one joker but since it would show up almost every turn (every turn that it wasn't the last card). I watered down the actual chance card deck by including 2 (black) No Event cards for each event card. This worked really well. (as in "oh gawd what now?" "phew! black card, move along|)

Last but not least, I decided to not make any attempt to match turns played to historical time frames. As it turns out though, I played 10 turns which is close to the theoretical scale of average of 4 turns per hour. Even better, a goal since the 1980's has been to have wargames last the same amount of time as the original battle and at about 3 1/2 hours, this was pretty close. 

Turn 1. The gun boat opens fire as the Americans emerge from the woods, the cavalry scout has started back peddling to safety and the Voltigeurs and Indians are mixing it up the US 4th Brigade in the woods.

Tomorrow, the game itself. Gotta go do a happy dance and then some chores.   


Sunday, July 15, 2012

Recce: We have met the enemy and we are their's.

The game is afoot.
Some where around Turn 12.

Once again, the game was Reconnaisance in Force, the Grant TT from Battlegames Issue #14. The rules were the latest draft of Hearts of Tin with simplified morale rules and many restrictions lifted. This time the game was set in Northern Atlantica, near the territory of the Brethren, renown pirates of mixed European and Atlantican heritage. Not much research has been done yet on the history of North Atlantica so many things are unclear. As far as I can tell, both San Carlos and the The Faraway Trading Company are attempting to establish trading rights near the mouth of the Kapelle River. (See previous game) Given that San Carlos is a dependency of Oberhilse, it is not surprising that there seems little prospect of the two rivals co-operating.

The forces were as follows:
Faraway Trading Company:Larsens's Lancers, Regular Cavalry (9)
Director General's Bodyguard, Regular Cavalry (9)
FTC Voyagers, Irregular Lt Infantry. Muskets (9)
FTS Shannon Naval Landing Party, Lt Artillery with Rocket (6 gunners)


Queen's Troops (on loan to FTC)
Brigadier Stoneforte.
Green Tigers, Regular Infantry, musket (18)
Buffs, Regular Infantry, musket (18)

San Carlos
General Paz

Grenadiers, Regular Infantry, muskets, (18)

Coast Guard, Regular Cavalry, (9) (ahh so their nickname is really Paper Tigers, its all those Customs forms, I always wondered.)

The Brethern
White shirts (Sailors or as the FTC refers to them, Pirates), Irregular light infantry, muskets (9)

Villagers, Irregular light infantry, muskets (9)

Tribesmen, Irregular Impetuous Spearmen (18)

Light gun, (6)

Note on 40mm figures used: The cavalry are all conversions based on Zinnbrigade homecasts, Gen Paz is Irregular, the Queen's infantry are conversions of Scruby 1812, the Grenadiers are Zinnbrigade Napoleonic French, some of the natives are converted Prince August Skraelings, the rest are mostly original homecasts.

Having decided to try the card deck with activation by unit or Brigade Formation, I added 3 Jokers to trigger chance cards when drawn. Part way through I cut it to two but one would have been enough or the chance card deck could have been cut with No Event cards. Over the course of the game the following chance events happened:
  • Thunderstorm (turn ends, next turn movement and combat affected), 
  • Huzzah! (a +1 on melee dice) 
  • We Marched All Night (unscheduled reinforcement), 
  • Raging Torrent (no effect since there were no streams), 
  • They Couldn't Hit an Elephant (chance of random hit on General), 
  • Rising to the Occasion (new commander created) and 
  • Dysentry (unit suffers penalties). 


The cards were fun, added to the story and had a noticeable but not decisive impact, especially since all of the bad ones fell on the FTC.
I played the FTC forces and used a combination of common sense and the old method of dice throws to control the San Carlos forces. (for example: Coast Guard, 5,6 charge Lancers, 3,4 hold position, 1,2 redeploy to the other side of the village.)

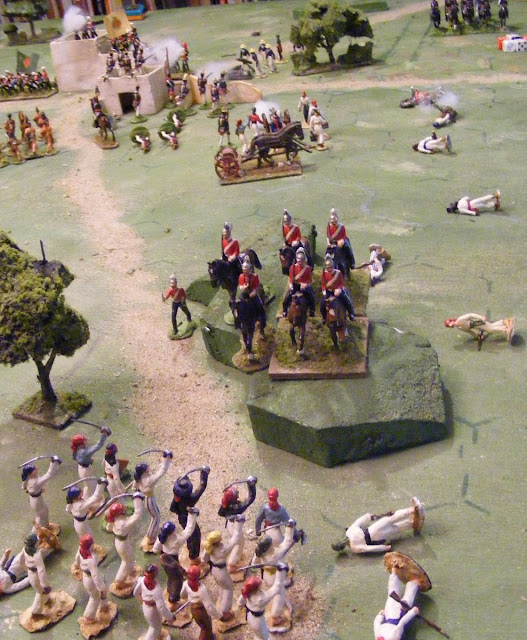
The first dozen or more turns went quickly and uneventfully with the FTC seizing the vital crossroads and having massed 2 cavalry regiments to face a handful of skirmishers on one flank. The first chance card of the game had resulted in Inspector Black of the FTC showing up unannounced and joining Larsen's Lancers.
He led them forward in a stirring charge. They would have to face 2 dice of fire from the pirates but would have 4 dice in melee getting 1 hit for each 4 or 5 and 2 hits for each 6 plus a die for 4,5,6 from the Inspector. The Pirates would only have 2 dice needing 5 or 6 to get a hit. Odds were that the charge would rout the pirates and open up the San Carlos flank. As you can see in the picture, the pirates shot one lancer on the way in then dragged 2 more off their horses while the Lancers hit absolutely none though the Inspector, a civilian, got one. The Lancers rallied back.

You'd think this would give the Coast Guards something to think about but, as in their first appearance under that name, these lads are eager. I did roll for it: charge, hold or work around the flank but a 6 send them straight in. The odds were of a repulse but if they won, the flank was wide open and the Rocket battery at risk. Well, it was a repulse but the Tigers rolled up. Luckily for the Coast Guards, I forgot that shaken units rout if they lose a melee and I let the survivors ride back to eventually rally on the edge of the board. Despite the momentary set back by the Lancers, things seemed to be going the FTC's way. A sound deployment trumps luck.


Charge! Charge! Run Away! Run Away!


The DGBG was well placed in support so while the Lancers rallied, they rode down the Pirates, pursuing them to extinction. (Odds were that should have happened on the 2nd or 3rd round of pursuit but the DGBG, being what they are, tried never to kill more than 1 Pirate per round whenever possible). I had barely picked up the routed pirates when the chance card "We marched all night" came up for Black. There was only 1 Pirate/Atlantican/San Carlos unit left on the shelf and it was supposed to appear on a road if possible. So, a few inches away from the now rallying cavalry appeared a band of 18 sailors (Pirates) with melee weapons, looking for revenge.(almost smelled like a trap). The Bodyguard got lucky and moved first next turn, back peddling and rallying as quickly as possible but eventually they had to counter charge the angry pirates and were chopped up badly. In their inimitable way, they then threw a one for their rally Roll, four turns in a row, eventually straggling off the back of the table and out of the game.


Where the heck did these guys come from?

While the cavalry was hunting Pirates, the San Carlos Grenadiers, inspired by the diminishing numbers of their enemy and by a Huzzah chance card, stormed the buildings in front of them, routing the Voyagers. Undaunted by the repulse of their cavalry, the villagers pressed forward, sniping with effect at the Tigers. Behind them the Atlantican Spearmen massed, gathered from 3 different tribes, they were keen to defend their lands and launched them selves against the Tigers. Their odds of winning were no greater than the Tiger's had been but apparently righteous indignation counts. Several spearmen went down from musket fire as they charged in but in melee they smashed the Tigers and sent them reeling. Only the presence of the Buffs in the adjacent building (and the enemy frontal zone restriction rule) saved them from being over run. Instead, the crazed spearmen threw them selves against the village, trying to climb the walls in the teeth of a fierce musketry but eventually they had to fall back.
The FTC had suffered some heavy blows but all was not yet lost. Stoneforte rallied the Tigers while Inspector Black led the Lancers forward again. They rode through a hail of grape and smashed into the new band of pirates sending them reeling. They longed to pursue the pirates until they scattered but that gun could not be ignored (frontal zone rule again). Swinging slightly right, they rode over the gunners, cutting them down but a final blast of point blank grape knocked the Inspector from his horse and brought down 2 more Lancers. Shaken, the remaining lancers pulled back.


Never trust the dice!

The Voyagers were already suffering from the combined fire of the Villagers and the Grenadiers when a "friendly" rogue rocket slammed into the back of them. On its way, the rocket had zoomed low over the Brigadier, knocking his hat off. (I pulled the chance card "They couldn't hit an elephant" and there he was, right in between the rocket battery and where the rogue rocket landed. I rolled 2 on the risk die, just avoiding death.) You can't make this stuff up!)


The pirates, left to themselves, rallied and prepared to continue the fight.

In the center, the Buffs, jubilant after their repulse of the spearmen, had found a keg of rum. Before their officers could stop them, the men were in no fit state to hold off the combined remaining enemy units. (The chance card said Dysentry or other ailment, -1 to all rolls, rum seemed more likely in the circumstance.)

Bugler, sound retreat!

Technically the game was not yet lost but hope of winning was small and in a campaign context the probably losses were not worth the long shot of victory. Stoneforte ordered the retreat.

_______________________________________

Next up Return to Crysler's Farm

Saturday, July 14, 2012

Good News Bad News

Another 32 degree day in the shade. Too hot to work, too hot to finish painting the last of 3 Elastolin conversions  (sweat dropping off the brow and all) but a dedicated fellow like me can still play a game or two.  The initial goal  was a 3 game mini-campaign.

   The first game saw Naryatria and Roscia clash over an obscure crossroad as per Reconnaisance in Force, the Grant TT from Battlegames Issue #14. Only 6 units aside, the rules were Memoir 44.  Yeah I know, that's WWII and this is Nineteen Sixty-Something but I figured that these armies were first raised for AK47 where a Tank is a Tank so the same should hold true.  I played the hand of cards normally for Roscia while throwing several cards away each turn for Naryatria. In both cases I didn't draw the replacement card until the next turn so as to keep it a secret. It all worked well with 2 exceptions.

The 1st was that while the cards worked ok, without the hidden factor, holding a hand of cards seemed like more work than it was worth since my memory, poor as it is, wasn't bad enough to forget what the other side had. I did my best to play as if I didn't know, but it became more work than fun. Next time, I might just draw 2 or 3 cards each turn, play 1 and discard the rest for both sides.

The 2nd thing  is that "MY" guys lost!   The Naryatrians lost a tank, a Mechanical (Patrol Car) and 1 stand of Elite Lion's Brigade infantry but they took the Crossroads and knocked out a Saladin, 2 stands of Commandos and an M113 mortar carrier.


The not-quite-modern-anymore game went so well, and resetting the table felt so much like work, that I decided to break out my ancients. (See Gathering of Hosts for a post game discussion) .  In short, the Memoir game had worked so well, I went back and re-tweaked my ancient rules to fit hexes again and really liked the feel of the game.  It is just sooooo much easier to write simple rules when a stand = a unit, and you can specify easily defined zones. Its also easier when you become accustomed to a wargame as a "game". Oh, and and my side won to boot!

Lots of good news but you can see the troubled waters ahead right? Don't worry, we'll make it.


The question that arose was of course, "If this works so well, why not convert all of your games to hex based, a unit is a unit, games?"  Why not indeed? What was I looking for? There seemed no option but to break out some 40mm troops and play for an answer. I've been wanting  to get into some more Colonial, asymmetrical games,  but until I figure out what feel I want, and how I want to organize my armies, I can't get seem to get at painting figures. This was a small game, only 6 units a side and San Carlos already has a history of working with the Bretheren, so I figured that I had enough. The native Atlantican spearmen are a mixed bag of 3 tribes but its a start. The temptation to improvise hex sized units and some rules was strong but a game of the long planned sort made more sense.

The game was .....OK. Great would have been better, but OK isn't all that bad really.   I thought maybe there were some broken rules but it turned out to be something else. I had consciously built the rules so that a line infantry unit was balanced against a light infantry or cavalry unit half their size as suggested in Scenarios for Wargames. Due to my confusion and hesitation to decide on unit sizes over the last 3 years, I ended up fielding 24 man line infantry and but just 8 man strong light infantry and cavalry units. Some quick post game testing showed that 12 or 2 x 6 light infantry and 12 cavalry would have been a decent match as intended. 
So that wasn't it, that was just an error in picking forces, I should have made the light infantry sharpshooters or given them rifles, added a 3rd unit or cut the size of the line infantry. 

But there was something else missing. MacDuff had been written for small Colonial clashes like this but HofT had theoretically been written for larger battles of the type I rarely if ever play. Since I intended to use them primarily for Teasers with a toy soldier flavour, I had consciously try to modify them that way but it seems that my subconscious had been trying to sabotage that process by concentrating on various Historical battles as sources of testing and example when designing. The result was a game with not quite enough story for a Colonial toy soldier game, not enough meat for a "serious"  tactical or operational WARgame and not enough "game" for just a game. It seems I had violated the "maintain your aim" principle.

I might have missed this if I hadn't been playing Memoir recently and looking at Battlecry. All was not lost because I've been playing with variations on the core for 9 years now and I know its solid. Its all the extra complexities and restrictions that keep sneaking back in that are the problem, as well as the avoidance of things that smacked of "game-iness". (Oddly but predictably, once I'd stripped out some of the extra complications I re-ran one of my tests, Montcalm's attack on the Plains of Abraham and getting the historical result is now easier! )

Luckily, the game had been sufficiently fun to re-remind me of just what it was I was looking for, what it would feel like and basically how to get there. So some of the inevitable tweaking followed to remove restrictions that had crept in, the whole disorder and 25% thing got turfed for the nth time and I reset with the smaller forces and stood back. Something still wasn't right. During the first game one chance card had come up, that was it. More would be better, I decided to go back to card activation but by unit since there were no brigades on the table. I mixed in a couple of jokers and set to.  YUP, this is the rules/game I should have taken to Huzzah! (damn). 

Will they still work for my ACW battles? I don't know, I hope so but if not, I'll write a separate set of battle rules. One important thing is that I think, at last, that I could take a non-wargamer and have this make sense to them, one of my secondary goals and thus making them suitable for my War of 1812, set to be my "historical cover story" collection.

So now I have sign off in terms of rules, organization, basing and setting for my Ancients, Dark Age, Medievals, 16thC, 18thC fictional, 1812, Mid 19th C and 1960's collections. It's time to get painting. (Once the weather cools!)

Tomorrow, I'll either look more closely at the 2nd Atlantica battle or maybe I'll let the Newport Noodle report on it.   


Thursday, July 12, 2012

River Crossing Denied

Another week, another CS Grant scenario played with Memoir 44.

No fancy effects so please imagine the Pzr IV sinking below the water while the crew of the Sherman cheers wildly about their first shot of the game (and last but who's counting?).

This scenario gave us a couple of bumps to work out. Once again it calls for dicing for turn arrival which doesn't seem to fit. I suggested that, given the difficulty of moving multiple units, we ignore the dice and allow units to be brought on at the player's choice of turn, BUT no off table units may be "ordered" only the new "On the Move" option which appears on some cards may be used. They reinforcements may have arrived slightly earlier than in the original but the last unit on didn't have time to move to the front and the game was verrry close so that option seems to move.

The next issue was the boats. Grant lays out fairly specific rules for the boats but how to translate them across systems. There were no reusuable boat rules in Memoir but they did have some river crossing and amphibious landing rules so we studied these and came up with having units stop when they boarded a boat, take 1 turn to cross and then are free to move and fight as normal on the 3rd turn. No fighting while embarked. We started off trying to track the empty boats and current but decided not to bother next time, just limit the number of units that can be on the river on any one turn.

We've also not been happy with either Tiger rule option so after some discussion we put together 3 rules to make one that worked better for us anyway. The Tigers were classed as Elite which allows them to take 4 hits instead of 3 (meaning even  a lucky shot with 3 hits like my Sherman got vs the Pzr IV wont kill a Tiger) and we gave it the longer range and anti-tank punch of the Tank Destroyer or Heavy Anti-tank gun units  but to level the playing field a bit, restricted it to a 2  hex move instead of 3.  it worked really well with the Tigers able to rely on their long range, punch and ability to take damage while the Shermans made use of their speed and combined arms.

Lastly, we again discussed unit translations. We had been going with 2 Memoir units per Grant unit and that looked good but it either made for a much longer game if we raised the Victory levels or else 1/2 the units never got to do anything before the game ended. We didn't have all  day for this game so we cut it back to 1 unit = 1 unit which produced a fast paced 2+ hour game.  The table isn't big enough for the full Overlord rules but we may check out the possibility of adapting some of the rules to a facilitate a larger all day affair.

The scenario calls for the attacker to establish a bridgehead large enough to stop small arms fire against the boats. Ron was allowed to nominate the LZ after the game began and the area was marked out as a majority held victory point for him only. Meaning if he had the majority of troops within the zone, he got an extra VP.
  
A slightly wider angle. Both pictures taken using my old Motorolla Razr.

Once again the game was too faced paced and exciting to remember cameras  so these 2 views of my early lucky shot (1/3 chance of a hit on each of 3 dice = 3 hits) are all I have.

Ron gave himself a major headache by choosing a landing spot on his left flank and cramming the vast majority of troops into that sector. Unfortunately, I drew most of the left sector cards and held them because I had almost no units on my left except a dribble of reinforcements. After the fact it was clear that deploying artillery and mobile troops in the center would have seriously enhanced his ability to support the river crossings.

As it was, the first wave stormed across into the center of the hole in my line. I rushed defenders from my main position (deployment as per scenario) to block them and got lucky on cards and combat dice, destroying or forcing back the first wave.

It was the first time we had used our improved Tiger rule and it was about 1/2 way through the game when we realized that they had the range to direct fire across the river with effect. So did the mortars if they were moved up and the artillery. Eventually Ron developed a fire base and drove back my units. 


Having few units I did my best to retreat damaged ones to avoid losing victory points, using reinforcements to plug the gaps. This tactic eventually allowed Ron space to cross over with Tigers and infantry but it kept his VP count down while I picked at him. Ron's troops of course, tended to end up with their backs to an unfordable river.......As before, I relied heavily on my American artillery but it was definitely an all arms affair and a squeaker of a game.  Final count,  1 Tiger, 1 Pzr IV and 4 infantry destroyed vs 1 Sherman, 1 Tank Destroyer and 1 infantry. Ron's 2nd Tiger was 1 hit away from destruction and my remaining Sherman and 4 of my infantry were all down to 1 hit remaining, even after a successful Medic card. that briugh 2 back from the brink. Phew!