Friday, August 30, 2013

To horse!

When I bought my first couple of 40mm Elastolin figures about 10 years ago I had no expectations of ever having enough to game with, it was just an indulgence, a few collectibles to go on a shelf because I had always wanted them.

Prince Michael, on horse and on foot. 40mm Elastolin conversions.

 It was a "right time right place" ebay purchase of a hundred gold vikings for ten Euros that suddenly changed that. I still didn't know what kind of games I was going to play with them but suddenly I was in a position where the occasional lot of cheap-ish broken figures and kits would allow me to convert and paint small wargame "armies". 

The making of a mounted prince. 

In 2009, when I was playing through Scenarios for All Ages, I came to a Scenario 18, skirmish scenario that called for small numbers of single figures. Most of my horse and musket figures were on multi-figure bases at the time and suddenly the Prince Valiant figures seemed like just the thing so I had a closer look at what I had on hand. One of the broken figures I had purchased was a Prince Arne who had lost his triangular medieval shield and had been given a round shield from a viking. I gave him a name and sent him into battle. Suddenly a character and story line and setting were created.

Prince Michael in his first battle.

As I was working on turning the layout for Hook's Farm into a Saxon raid scenario, it occurred to me again that sometimes it would be good to have a mounted version of Prince Michael. Turning to the spares box I dug out one of the Prince Arne kits that I snagged from Wally's Basement at Historicon 2011, one of the remaining gold vikings for his shield arm, and a spare horse. I was sifting through various mounted figures looking for a set of legs when I realized that I could use an old toy soldier converter trick, carve out the legs and tunic a bit and mount the prince directly. I should really have either bent the left leg for a stirrup-less grip on the horse or straightened the right leg to fit long, knightly, stirrups but I was afraid the result would be fragile and finicky and decided that I could get away with leaving things as they were.  A bit of putty to add a sleeve to the new arm, repair the tunic where it meets the horse and add a saddle, and he was ready for paint. 


Thursday, August 29, 2013

News comes to Pook's Hill

Marcus Elastolinius, a retired Centurion,  receives disturbing news at his villa atop Pook's Hill, a Saxon Dragon Boat has been seen approaching the nearby Minas Basin. The messenger is given a drink and sent off to Brooklyn to summon help.

Wednesday, August 28, 2013

Detour.

As the summer heat wanes slightly and painting become more possible, work on my 40mm fictional armies has stalled again over questions like unit organization and how many of which figures I need vs what it is I want to paintLuckily, the matter is not urgent and there are other things do do. 

The game tomorrow will be Memoir 44 but the first squadron of Scots Greys will report to Ron for basing and glossing.

The first Squadron of Ron's Scot's Greys are ready to be handed over and the second on their light grey/white horses is well under way. The Dapple Grey horses were fun but when I was blobbing paint onto the hats and saddle cloth, I couldn't help but remember the days when, with naked eye and steadier hand, I could paint a legible GR on a saddle cloth and a recognizable white horse, rose and thistle on a 15mm figure's cap. Oh well, once they are glossed they'll do fine. I imagined them charging Ron's Austrian Dragoons and rolled 5 Battlecry dice, 3 cavalry and a saber, they'll do!

Now I can get back to some early medieval/fantasy  figures for Prince Michael. I won't get enough done by this weekend for my full length adventure on a table game but Arthur's comment on Hook's Farm has given me some ideas which mean only slight changes to the table will be needed. A Romano-British famil in an isolated farm, a Saxon raiding party, a rescue expedition.....I could use an appropriately sized Roman Villa though.......... 

Sunday, August 25, 2013

The Battle of Victoria Farm

I know, I know, choosing this scenario showed a shocking lack of originality. I'm not sure how many people have played variations on it over the last 100 years but even I have done it before. (Points awarded to those who figured it out without looking) Still, its a good one and I suspect I'm not done with it yet.


   An over view at the end of the first move from behind Red's left.


The armies are the same for both sides. The original scenario gives numbers of infantry and cavalry not units but having decided on 12 and 6 figure units for this game, a minimal bit of rounding gave each army 4 units each of infantry and cavalry and 3 guns. This seemed like too much artillery for such a small force in the 1860's so I swapped one gun on each side for sharpshooters. It occurred to me that the gun crews in the original were drawn from the infantry and cavalry which suggested a reduction in numbers and the inclusion of horse artillery but I decided to just add foot artillery crews and go. Initially I added 3 Brigadiers as well as the General but they seemed like overkill for such a small force so I dropped them.


Turn 2, the artillery is deployed, ready to fire.
Using the original deployment, Red deployed one gun, one squadron and one battalion (wing? company?) on the left with initial orders to seize the church. The rest of the force was deployed on the right with a clear gap between the two wings. Blue deployed with his force concentrated around the farm on his left and center. I had initially planned to use MacDuff but as the set up progressed I decided to go with Rattle of Dice after all. 

Turn 2. The view from the other side.

The first  couple of turns went smoothly but with a do or die cavalry clash looming in the center I was forced to decide how long to continue following the original script. It had been a long week and I was tired, instead of making a decision I diced for each side in turn: 1,2: act cautiously and try to preserve the cavalry, 3,4: make a limited charge, 5,6: all in. Red moved first, rolled low and pulled its cavalry back, opening fire with its right hand gun and advancing the infantry into range. 


Blue followed suit but I over ruled the dice since their cavalry was under fire with no room to retreat. I pulled back 1 squadron and launched 2 squadrons of Blue Dragoons into the Red Infantry. One unit of infantry held but the Royal Fusiliers broke to the rear. Before Blue could pursue, the Princess Charlotte Dragoon Guards charged in only to be repulsed in turn but it was enough and the Fusiliers rallied.     

Turn 3 and both sides open fire.

The next few turns saw an artillery duel between the Church Hill and Blue's center in which Blue gave better than it took. Near the Farm, Red and Blue infantry traded fire with a slight advantage to Red but Blue occupied the farm. Red's only hope seemed to be an all out attack.  The garrison of the church was sent forward while the lancers on that side were moved to the center. Blue responded by shifting the squadron of Frontier Horse into reserve in the center. 


Turn ?? The battle rages.

An assault on the Farm by the Fusiliers was repulsed but as cavalry charge and counter charge flowed back and forth across Farm Hill, slowly the advantage shifted to Red. One final joint charge by the veteran Larsen's Lancers and the Queen's Lancers, fighting their first action, routed Blues's last cavalry reserve, dropping Blue below 50% of his original units and ending the battle. 

The long string of Red defeats was finally broken. 

Colonel Flint surveys the scene of his regiment's first victory.

And so ended another brisk little action which left all sorts of thoughts bubbling in my brain. I'm going to let them simmer for a day or so then I'll have more to say.

Friday, August 23, 2013

This Week's Fox

The weekend approaches, the continuing unusually hot temperatures seem to be relenting a little, the old sub floor in the kitchen of this old farmhouse has been stripped off and Kathy is off to a dogshow. In other words conditions are just right for another solo game.
Red and Blue armies clash at Long Hill, Victoria Farm on the far hill, Cross Church on the near hill.

Last week's game coupled with a recent post on the  http://thepennywhistle.blogspot.ca/ blog disturbed sleeping  memories of past Morschauser/V&B like games where a stand of 40mm or 54mm figures is a unit, even if its just 2 or 3 figures as well as bringing back to the fore my pondering about how many figures/units I can field without overcrowding the table, preventing maneuver and securing flanks on the table edges. In an effort to stifle the thoughts a little, I decided to throw a small game of either MacDuff or Rattle of Dice on to the table  using small 12 and 6 man units.

I was a bit tired with a long non-wargaming to-do list  so rather than spend time and energy coming up with either an historical action or an interesting scenario I just plumped for a quick encounter game such as one might find in an old wargaming book.

Red's right wing advances towards the Sugar Shack and Rose Cottage.

Depending on how things go, the game will be played either Saturday or Sunday. Next weekend will see the return of Prince Michael. 

Sunday, August 18, 2013

Broken Ground

The scenario I chose for this weekend's game was Broken Ground, Scenario 2 from CS Grant's Programmed Scenarios. After a bit of contemplation I decided that if I was going to use the Scots, it was most appropriate for them to defend against an English invader. A perusal of the force choices crossed with the available troops led to the following armies:

Franco-Scots
General Commanding: Le Comte de St. Lambert
(With a large French contribution I assumed the French General would insist on seniority)
Scenario Army List 13: 5 inf, 1 lt inf, 1 MC, 1 LC, 2 batteries.  

Left Wing: Earl of Douglas  with 6 units of Scottish pike
Border Horse: Lord Home with 2 units of light cavalry lancers
Center: The Rhinegrave with 8 units of Landsknecht pike and 2 of shot.
1 Heavy Gun
Reserve: Le Compte de St. Lambert with 1 unit of gensdarmes and 2 of lancers
Right Wing: Earl of Argyl with 4 units of Irregular swordsmen and 2 of irregular archers.

The Allied army deployed first. The plan was to adopt a central position with a smaller force of Scottish pike to hold or at least delay the enemy on the left while the Highlanders took post on the far right ready to flank an attack on the centre or to thwart an attempt by the enemy to swing around to do the same. The small amount of cavalry was held in reserve. It seemed a sound enough plan on paper but alas, the Duc has been commanding too many continental armies recently and did not make sufficient allowance for the lack of firepower in the Allied army made worse by the English having snapped up the vast majority of available mercenary arqubusiers in addition to their own archers. Normally I field 3 pike and 1 shot for each Grant scenario "infantry unit" and 2 shot for each "light infantry unit" giving me close to 15% over all but I ran out. I should have used my Scots arquebusiers for play balance. To make it worse, while setting out I accidentally checked against with list 8 and only fielded 1 gun instead of the intended 2. This was to have consequences.


 The English army approaches!
English Army
General Commanding: Earl of Belmont
Scenario Army List: 4 inf, 3 lt inf, 1 HC, 2MC, 1 LC, 2 batteries

Advance: Captain with 2 LC Mounted Arquebusiers, 2 LC Lancers
Vanguard: Captain with 1 unit of swordsmen and 4 of Italian arqubusiers
Main Battle: Captain with 4 units of bills and 4 of bills
Reserve: Captain with 2 units of Gensdarmes (Bulleners) and 2 of Demi-lancers
Rearward: Captain with 4 units of bills, 4 of bows and 1 of swordsmen.
1 heavy gun, 1 light gun.


The English had to roll to see if the Border Horse and done their job and they hadn't. No recce, the army had to march on in column.
The allied centre is "amused" by the English light cavalry while their infantry slowly deploys.

Its always the same old problem for the Scots, especially if they have minimal French assistance. If they sit on a hill, the English will shoot them to pieces before driving off the remnants but if they attack too precipitously, the more mobile English will surround them and hit them from the flank as well as peppering them. It calls for careful timing.  Having the English arrive piecemeal in column was a good opportunity for the Franco-Scottish allies to launch a swift and decisive all arms attack to smash the vanguard before the rest could come to their aid, something their general spotted right away .......after the battle was over............ .

The Scots pike are hit hard by arquebus fire leading to a summary decision to revert the "to hit" roll back to the usual 5,6.

The English mission is to capture all of the high ground over looking both of the roads. Essentially they have to rout the enemy. Looking at the Allied deployment, the Earl of the Belmont decided to send the cavalry to threaten the enemy right until the time was right to sweep away the Highlanders and flank the Germans. Since said Germans made a nice deep artillery target and had a small skirmish screen, the artillery would deploy in the centre to pound them backed up by arquebus fire. The mercenary shot were already harassing the Scottish pike so they were ordered to disengage and move to the centre. That left the 2 divisions of English infantry. The first was sent to drive the Scottish pike off the hill with the second hanging back ready to go either right or up the centre depending on events. 


Having endured a steady rain of arquebus and bow fire, the Scots find the English foot at hand and charge downhill, almost driving them back.

On the Allied right the Scots pike took a terrible pounding from arquebus and bowfire but at last the English got close and the Scots charged. The initial charge downhill was their best shot but they needed exceptional dice to rout the English and they only got average. A protracted struggle with heavy losses on both sides ensued before the Scots were finally driven back. Rallying against the odds they seized a shift in initiative and charged back in driving back the English. It didn't last. Falling back in good order the English concentrated their archers and shot apart the final stand of the Earl and his retinue.

On the far flank there was protracted skirmishing between Highland archers and the mercenary mounted arquebusiers back by the English Borderers while the first English gun finally deployed and opened fire.

Realizing at last that he needed to act, the Duc de St. Lambert joined his French cavalry and ordering Argyll's Highlanders to support him, advanced and charged the English cavalry while the Landsknechts were ordered to over run the enemy guns and then wheel to take out the last intact English battle. 

The tremendous shock of the cavalry clash resulted in the destruction of both cavalry wings and the wounding of St. Lambert (oops the double dice charge bonus was supposed to be just against infantry). The way was open for Argyle to wheel his clansmen and drive off the English skirmishers but being on his own, it seems that he wasn't willing to risk his men to save a pack of Germans or some Lowland town (a series of 1's on his "out of command" rolls).

Alone, surrounded and reduced to 1/2 strength, the Rhinegraf plants his halberd and opens negotiations.

There was only one real problem with this game. I meant to set it up and play the next day, or after supper but once it was set up, I was curious so I played one turn, then another and another, then twice I was going to take a break but I wanted to see what was going to happen. Three hours later......oops late dinner for every one. 

So, YES! A successful reappearance for my 16th C lads and just the sort of wargame that I had had in mind. There were a few small issues with the rules, shooting was a bit more effective than planned as were the highlanders, the cavalry vs cavalry charge too deadly and there was nothing to stop an army from fighting to the last stand,  but over all they worked well, especially for a first run through. The initial rules post has been updated to reflect mid-game changes.

Now I need to add enough Scots to fight on their own as well as increasing my French troops and adding some crossbowmen, and then there is my one, lonely stand of Turks.....

Saturday, August 17, 2013

The Thistle, the Lily and the Rose

The die is cast, the 16thC it is. My rules of record for this are Rough Wooing but I'm not in the mood for card draws and variable moves and don't wish to fiddle with it so have drawn up a simple variant on Rattle of Dice modified both for my 60mm multi-figure bases and the period.


The Thistle, the Lily and the Rose
A simple set of rules for Anglo-Franco-Scottish 16thC Wargames by Ross Macfarlane.
(18 Aug 2013)
GAME UNITS

Each stand is a unit. A general counts as a unit for all purposes but also has a leadership function for units assigned to his command. Groups are formed by one or more units under the same general which are touching and aligned. 
Units class may be Elite, Trained, Irregular or Levy. 
Troop types are Gensdarmes, Cavalry, Light cavalry, Pikes, Bills, Swordsmen, Shot, Light Artillery or Heavy Artillery.

A unit is removed when it has taken hits equal to the number of figures. When a group takes hits the owner must consolidate the hits onto a unit of the same type, with excess hits being consolidated onto a unit of his choice. For example, if a group of pike stands  took 5 hits, 4 would be applied to 1 pike unit which would remove it then the remaining hit would go where the player chose.


SEQUENCE OF PLAY

Roll for initiative each turn, high score chooses to go first or second. Ties repeat last turn’s sequence.


The 1st player units move including charges. Charge targets may counter charge if mounted cavalry.
Resolve melee between groups in contact.
The 2nd player units move including charges. Charge targets may counter charge if mounted cavalry.
Resolve melee between groups in contact.

MOVEMENT

Detached groups.
 If not within 12” and sight of its General at the start of a turn, roll 1 die needing 3+ to move, Elite +1, Levy -1


No unit may move farther than its allowance therefore groups  move at the speed of the slowest unit.


Individual units can move in any direction and change facing but may not go through another unit unless one or both are shot. Limbering/unlimbering takes a whole move.


A group may move full speed forward including a wheel or may retire at 1/2 speed including a wheel. It may not change the position of individual units while moving. If units join or leave the group or the player wishes to rearrange units within the group then the group as a whole must not move. 


Pikes/Bills 6"
Swords/Shot 12"
Gensdarmes 12"
Cavalry 18"
Light Cavalry 24"
Light Artillery manhandled 6" or 12" limbered
Heavy artillery 6" limbered or pivot.
Wagons 6"

Woods, Towns etc. No group moves. 1/2 speed for pikes, bills. No others allowed except on roads.

CHARGES
A unit that charges must be facing the target. If at least partly within the enemy's front they must charge the enemy's front. Gensdarmes, cavalry and light cavary may counter charge up to 1/2 way or may shoot, shot may shoot. A single unit of light cavalry or shot may evade a full move backs to the enemy. 

SHOOTING
There must be a clear line of sight to the target which must be within a 90 degree arc centred directly ahead to where the target is at the time of firing. Artillery must be deployed.

Shooting and Movement. Infantry and cavalry may move 1/2 and shoot before or after moving. Units in contact can not shoot or be shot at except as a charge reaction.

Range: Arquebus, crossbows, bows 12”, Pistols/Mtd Arquebus 3", Light Artillery 24", Heavy Artillery 36". 


Dice: Roll 1 die per unit. Each 5 or 6 is 1 hit.

Difficult targets: -1 vs cover or bows vs gensdarmes.
     
Rapid Fire: Bows that do not move may roll 2 dice at -1 per die.

Demoralized: -1
     
Dense targets: Artillery rolls against each unit of either side which is in the line of fire and within range.

MELEE
Melee is resolved between groups in contact.

Dice: Roll 2 dice per unit in contact if pikes, bills or swordsmen. Roll 1 dice per other unit in contact to the front. Contact includes corner to corner.


Cavalry Charge Bonus. Roll double dice if gensdarmes or cavalry charging.

Hits. Each modified score of 4,5 or 6 inflicts 1 hit. 

+1 Elite
+1 Pikes: Pikes charging or being charged frontally.
 -1 Disadvantaged: if cavalry fighting pikes frontally or if pikes fighting swordsmen or billmen, or any vs cover or an obstacle or uphill or if swordsmen fighting cavalry or if any fighting gensdarmes.
-1 Levy or demoralized.

With Me! If a general is with a group in melee he may choose to try to inspire the men from the front. Roll a die 4,5,6 = an extra hit on the enemy. 2,3 no effect, 1 the general is wounded and removed from the game.


Resolving Melee. If a group takes more hits in melee than it inflicted then it tests morale. If they retreat the winner may pursue up to 1/2 move.  Other results are a draw.


MORALE

(Group morale quality modifiers are based on majority)

Defeated in Melee.
4,5,6 continue fighting. 

1,2,3 the group falls back 1/2 move facing the enemy.
0 the group retreats a full move in disorder, backs to the enemy. 
+1 Elite -1 Levy or irregular
-2 suffered hits => the number of units in the group

-2 demoralized. 

Rally. A group which is in disorder at the start of a turn must attempt to rally instead of moving or shooting. Roll 1 die. On a score of 4, 5 or 6 it rallies, may face the enemy and may act normally next turn. On a score of 1,2 or 3 it retreats a full move in disorder and must rally again next turn. If it reaches the board edge it will leave and may not return. +1 Elite, -1 Militia or Irregular. +1 joined by army general, -1 if there are enemy visible within 12”, -2 if demoralized. 

Demoralization. When more than 1/2 of the units under a general's command have been destroyed, the rest become demoralized. They suffer penalties in shooting, in melee when checking morale.

Friday, August 16, 2013

Picking a fight

The translation of thought from the subconscious to the conscious can be a murky process at times. I will be Duty Caretaker Spouse for 3 days this weekend and 4 the next. This means I can't wander off for more that a few hours but doesn't stop me from enjoying several hours of leisure time packed around my responsibilities and the weather has finally relented making my games room once again a pleasant place to paint and play. So, a game is in order. But what to play?

An archive shot of a NQSYW battle on a similar weekend last fall.

The games I've played over the last few month have been enjoyable but were either what I consider skirmishes or petit guerre,  or they have been short games with simple scenarios and limited player options. My subconscious passed the message "I want the wargame to be a real battle this time". But, what did it mean??

Archive footage of last November's Cobb's Farm a full fledged battle game. 

At first I thought it might be about fielding masses of units and figures without being crowded.  The spectre of me interrupting things to order and paint a thousand 10mm French Revolutionary soldiers loomed large causing me in near panic to set out some 1/72nd ACW to remind myself that compared to my 40's they fit well into the scenery and I can fit quite a few onto the table without being crowded. (whew! bullet dodged). But while the 500 or so figures I had put on the table for the Not Really Pickett's Charge game a few weeks ago don't constitute a big game by hobby standards, it was most of the painted ACW figures I have and considerably more figures and units that the various small games I've played since, however, it didn't have the "feel" I was looking for since it was just a slice of something bigger and mission and deployment were pre-ordained.

So, I thought a bit about planning and generalship and the to and fro of decisions and the test of minds and wills between opposing generals.  A battle where the general/player  develops a battle plan, where to attack and with how much, where to defend, where to place reserves, followed by the see-saw of attack and counter attack, phase after phase through a whole day until one side collapses and is chased from the field.

So I went looking for an historical battle to base the game on but it didn't take long to realize that relatively few historical battles offer the sort of sweeping manouvers, chess like control by the commander and give and take that I was thinking of. No, it seems what I really wanted to do was fight a wargame like in the good 'ol days when a game involving a few hundred miniatures felt like the clash of mighty armies deciding the fate of nations.

The Seleucid Menagerie of Perry Grey faces the Persian Horde of Rossius the Younger in Jeff Lauzon's basement some time in 1980's. 

OK then it seems I just need to lighten up, stop thinking  about the man behind the curtain and whether or not that group of soldiers should be a brigade or a battelion, and pick the right sort of scenario. I think  Grant's Broken Ground Scenario from Programmed Scenarios will do as a start thus saving my brain from further strain but what about armies? ACW? Oberhilse & Faraway? NQSYW? or maybe the long idle 16thC English vs French & Scots? hmmm choices, choices......

Archive footage of a 16thC battle from December 2010. Its been nearly 18 months since these lads were out, the longest idle period of any of my major collections.


Wednesday, August 14, 2013

Meanwhile back in the SYW

Readers may remember that I occasionally play 25mm SYW games with my friend Ron and sometimes paint a few of his figures. To that end here is a sample Minifig Scots Grey.

Monday, August 12, 2013

25mm French Resistance: a Mini Marx Mystery

I have decided that the time has come for some much loved, little used childhood toys to go and give some joy and excitement to someone else. Amongst these are my tiny collection of 25/30mm mini-Marx playset figures and accessories, hard plastic French & Germans from WWI, knights and castle and soft plastic WWII.

A 25mm Marx German soldier from Over the Top and 5 French Resistance figures. I wonder if there used to be 6?

A lot of the figures and accessories  are broken or missing or repainted and I have no expectation of my bits and pieces being worth much but hopefully someone will be as pleased to get them as I was to get the Elastolins I had always wanted. Besides if they hang around I just know I'll be looking for compatible figures to make enough for wargaming and yes I have seen soft plastic copies of some of the WWII and alamo figures on ebay.

There is one mystery set though that I would love to ID, the internet having failed me. They were a stand alone set of painted hard plastic WWII French Resistance fighters. Painting, sculpting and size all match the Marx figures but they don't have the Marx logo and don't appear on any lists I've ever seen. There is a circular depression on the base but I cannot make out any mark. I'm guessing that they might be Blue Box only because I've heard that they did some compatible figures .
If anyone recognizes them and can suggest a source I would appreciate even an informed guess.

If anyone is interested in taking any of these before they hit ebay just email me at rmacfa@gmail.com for more info on what I have.

Sunday, August 11, 2013

Test shot

Having given up all hope of my camera ever reappearing, I decided to try out the camera on a damaged Samsung smartphone that I do happen to have, and which has a macro feature.
Samsung with Macro but no cropping feature, using flourescent white balance setting.

Alcatel, cropping feature but no macro, using flourescent white balance setting. 


The colour on the Alcatel is closer but definitely not as sharp. Well, I had wondered what to do with the broken phone.


Monday, August 5, 2013

A Behind the Scenes Look at Episode 13

This game was based on Betrayal, Scenario #43 from CS Grant's Scenarios for Wargamers.  As usual, forces, terrain and special rules were adapted to my resources and habits. 

(My apologies for repeating the same photos with different captions, with over 2,000 photos loaded onto my blog I was beginning to worry about reaching my free limit but I see today that there is still lots of room so next time I won't delete the extras.)

It felt a bit sparse fielding 4 infantry or 2 cavalry per "unit" but I had to hurriedly add 1/2 dozen figures and turn almost all of Prince Michael's British infantry over to the raiders to meet even that. As it turns out it was enough but I may need to add Urien of Rheged as an enemy to give a more comfortable home for the non-barbarian, non-Roman figures when I need to balance forces out.  

The designation of figures was made largely by looking at them and cross referencing past games as well as the scenarios.  The garrison was dressed in Roman fashion despite being native Briton's a useful and romantic if improbable conceit. The gate mercenaries were supposed to be Saxons but when troops ran out I included some Romans, including trumpet blowers, and hoped the allegiance roll would be friendly. Since the lone Irregular Celt stood out from all other parties and is a good deal bulkier than the average Elastolin, I made him a minor hero and put him on 1 gate. 
The rest of the garrison consisted of 4 infantry units, 1 in the tower, 1 in the "market" next to the wall on the right and 2 off table. The cavalry, consisting of a heavily armoured Sir Bors and his Elite squire, and the Garrison commander-Hero were also in the tower. Grant mentions artillery in the tower so I allowed the 2 catapult crews to sleep in the towers underneath their engines, awakening at the same time as other garrison troops. The infantry and cavalry were all classed as heavily armoured, the infantry having javelins (or throwing spears if you prefer)

The attackers were divided into 4 groups. In the book the advance parties are composed of 1 unit each of light infantry and light cavalry. I haven't done more Pictish cavalry yet (the main reason for their inclusion), the Saxons have none, and I'm not ready yet to have the Sarmatians revolt and become Huns in Britain so I stuck with light infantry. The Picts got 4 archers and 4 javelinmen, the Saxons, 4 archers and 4 elite light infantry of the fur bikini, shield gnawing, type, led by the newest addition, Eric the Redleg, a minor hero. 

The main Pictish body turned into 8 infantry and 2 light cavalry heroes, Dearg Mor and Buidhe. After his wounds last year, I decided to keep Dearg as an ordinary hero and rated the always unfortunate Buidhe as a minor hero. Not having enough spearmen for a hedgehog/proto-schiltron I called  the remaining Picts light infantry as well. 

Turning to the Saxons, Helgin was  a Hero/player General assisted by Raven, his elite standard bearer.  Not being able to identify any other discernible heroes, the 16 remaining "Saxon's" were classed as heavy infantry with javelin. 

Last but not least, there is provision for the citizens of the town to take to the streets to fight off the attackers. My stock of civilians for this mob thus far is limited to 1 milk maid, 2 labourers, a pageboy and a 1/2 dozen princesses and ladies. Not much of a mob.

I hadn't fit our young hero Michael into the picture yet. There were no troops left for him to command, I haven't done a mounted version of his figure yet and he is never one of the disciplined Roman garrison types.  My first thought was to place him with one of the gate guards but there should be a chance that these all go over to the invaders and anyway it might have unbalanced the scenario. Finally it dawned on me that he might have been at the inn and could appear as part of the civilians erupting into the streets. Since he is still young, I only made him a hero not a great hero. He has to have room to grow!

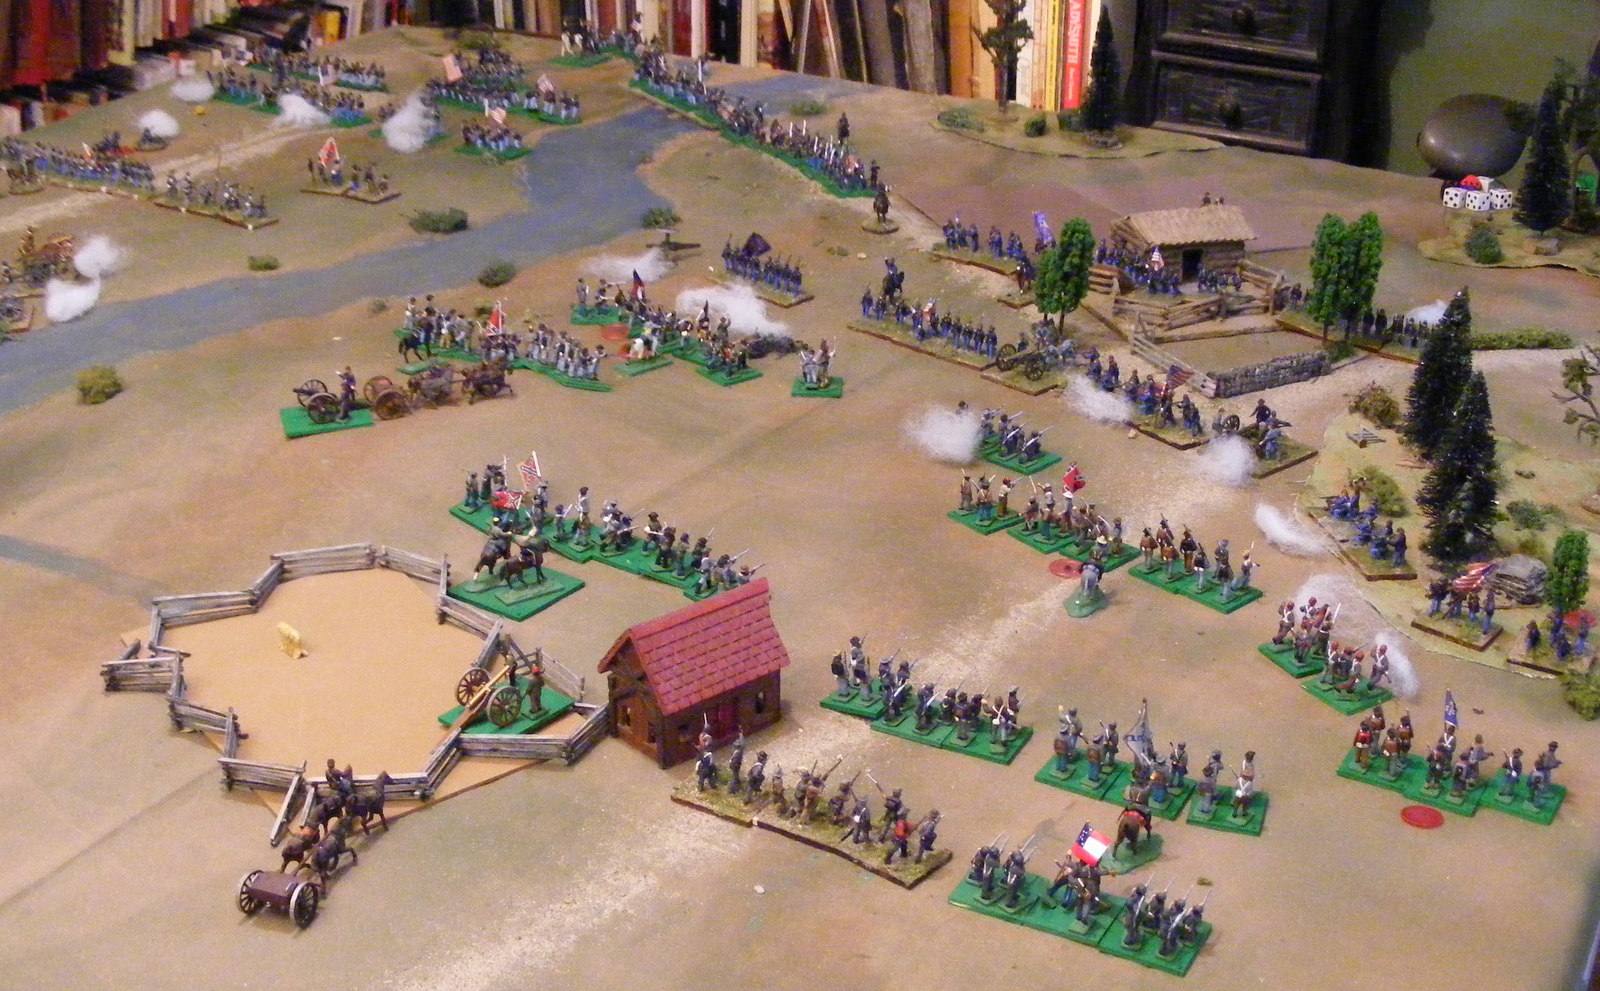
 A repeat view of the town. The garrison was quartered in the round tower and in the houses next to the wall in the upper right hand corner of the picture. The off table groups came in on the roads, 4 to the left of the tower, 4 to the right of it. The Inn where Prince Michael was staying is right next to the West Gate. (center of picture)

The game begins with the gates opening and a roll being made to see if any gate guards stay local. Grant suggests a die roll for a percentage but with only 4 in each group I decided 1 turned and the rest had a 50% chance of staying loyal. Each of my groups had 2 barbarians and 2 Romans and dice being the unpredictable things they are, the Roman figures all rolled loyal and the barbarians all went over. Hunh.

Turning to the advance guards, I started to move them and then realized the Picts were out of command. The odds of moving were 3 or better on 1 die, they laid low. On the 2nd turn, the alarm was given and the loyal guards attacked the traitors. At the South Gate the traitors struck down the loyal guards but the Picts outside still refused to budge. Luckily the main force also being light troops were rapidly approaching. At the West Gate the fight was a draw but the Saxons were at the gate and the last guard went down under Eric the Redleg's spear, this time being a hero helped.


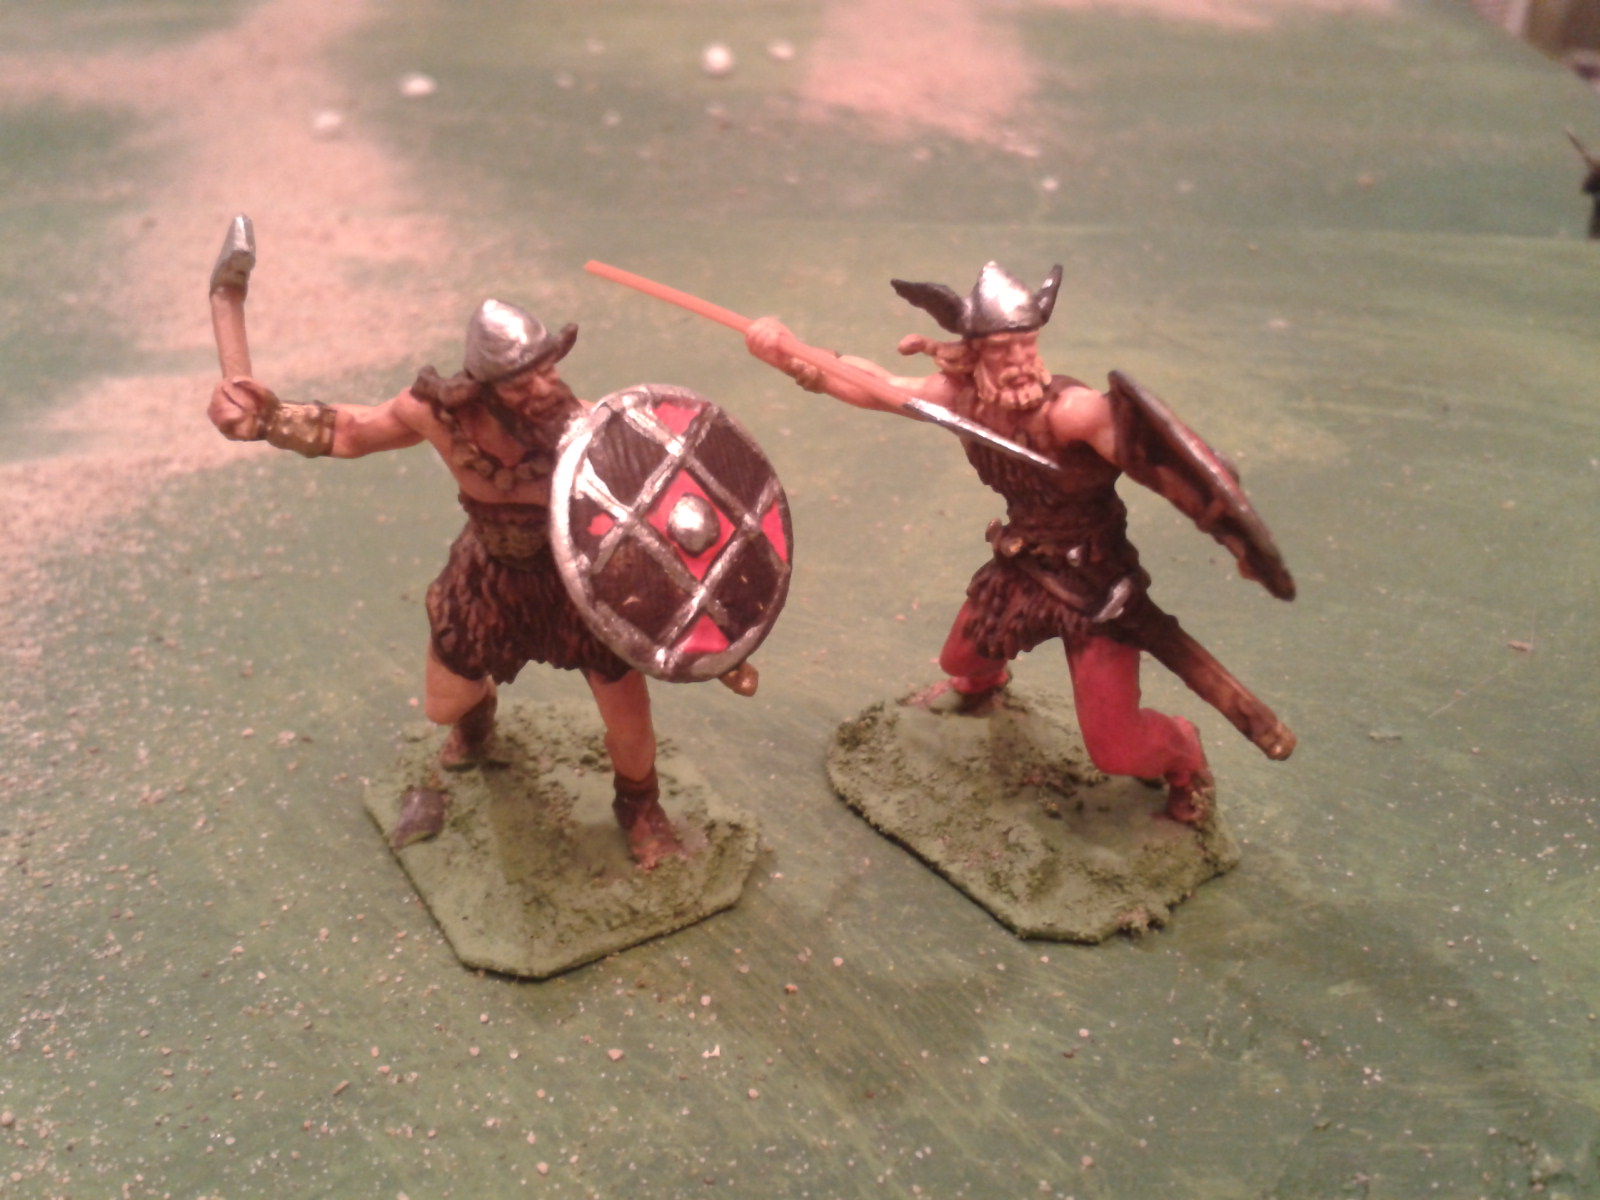
Here we see Eric Redlegs celebrating his first victory.  I almost used my old cloth since it matches the bases on these figures better colour wise but once on I was reminded of how much of a nuisance the over hang is since so many things like dice and scenery are now stored under my table. I also noticed, once again, just how wide those 1" square bases are. Eric sports a prototype of 3/4"x1" rectangle with the corners clipped which I've also been experimenting with for Atlantica. Wide enough to be stable but not so wide as to keep every one in open order. I had meant to flock them but ran out of time so just slapped on some paint. Seems to match the table fairly well so I may just fill and paint. I like when bases become inconspicuous.

On the 3rd turn the remaining garrison troops turned to and formed up. On the 4th turn, the Saxons again went first and charged into the group in the market. The streets were narrow so it was 3 on 3, elite light infantry vs heavily armoured heavy infantry. The Saxons rolled 3 x 6's, the Romans 1's and 2's and it was over, the last figure routing. Oops!  No Romans left in this quarter! Well, I had directed the cavalry that way anyway and they reached a point just behind the Saxon flank. At the same time Michael and his volunteers appeared in the street before the gate. First move would be important next turn.

In the narrow streets, the attackers had a hard time making use of their numbers. Having solid houses discouraged me from looking to see how the rules would handle detaching a few figures to work through them and thus around the flank. I figured they would have to come out again to attack and it was faster for the light infantry to go around. As it was, house fighting didn't come up so that's still an unknown. Street fighting seems more typical of pre-gunpowder wars anyway but I could use more occupy-able houses.

The Picts at last entered the South Gate and the archers finally rolled a 3 and crept towards the wall before stalling again and being abandoned by me! Because of his +2, Dearg got to move automatically and I let him control any of his men within 12" which  might not be what the rules for a sub-general actually say, if they say anything but it was such a small force and of the same general troop type so treating them like a single unit seemed fair enough. The first attack went straight on with cavalry in the middle. Javelin fire during the charge took out 1 figure but I messed up, rolling 1d/1 instead of 1d/2. The game was 1/2 over before I rolled 3 6's on 4 dice for shooting during a charge and thought "something's wrong". For the rest of the game the barrage of missiles during a charge became less deadly.

The poor Picts with 2 handed spear and no shield were a problem. The weakest troop on the board. I need to think a bit about the shield wall and hedgehog rules. The original idea was for them to be defensive, making combat less decisive but with the switch to a modifier for an opposed die roll, they are the same as any other modifier. I'm going to check out the possibility of them requiring a difference of more than 1 to win or allowing the 2nd rank to roll and let the formation pick the best die or something More thought needed.

Anyway, returning to the combat, the Pictish combat rolls were bad and they were forced to recoil. The Garrison chose to stand fast on the hill with secure flanks. Having the hero general with them meant no chance of disorderly pursuit.

The knights prove their worth and the vagaries of the 2 vs 1 combat is revealed!

Back at the market on turn 5 the initiative finally shifted allowing the knights to charge into the flank of the Saxons. With a maxed out +4 benefit, Sir Bors just managed to tie the melee! His squire won his but that meant a tied melee so the Saxons brought up more men and I realized that I had been pondering 3 ways of doing multiple  vs 1 combats and hadn't really specified any, merely implied 1 of 2 options. The way I have been handling 2:1 in MacDuff whence the melee comes, is to let each side roll 1 die per figure and then choose which figure to use. Medieval Mayhem which I had been using for Prince Michael treats it a series of 1 on 1 combats resolved sequentially with the single figure rerolling each time. The actual writing implies a series of simultaneous single figure matches with the single rolling once and applying the result to each opponent much the way that Armati does for unit to unit melee. The melee is so deadly that anything that slows it down is good so I opted for the MacDuff version. I'm actually tempted to go farther and borrow the Charge! version of needing more than 1 pip separation to win to make melee less deadly but that raises the spectre of also adopting the rolling 1 die for 2:1 but adding 50% to the total for the 2nd figure. It needs some thought but I'll probably opt for the MacDuff version of the 2 on 1 and leave the rest alone.

I was initially bothered that none of my civilians looked at all armed but the blacksmith guy who is supposed to be holding a wheel looks ready to give a good punch and the guy swinging a bucket didn't last anyway. I could use some cudgel men though.

Back at the gate Michael and Helgin appeared at the same time and thus engaged each other. One would expect the Hero to win over the Villain  but 2 turns in a row Helgin rolled up and Michael rolled down. Oh CRAP! Before I could spin a plot twist or storyline to save Michael, the knights won the 2nd round of melee despite being out numbered and pursued the retreating Saxons right into contact with the Saxon leader. There were 14 angry Saxons outside (the other 2 Saxons had been taken out by balista fire from the tower) but the gate was blocked by the melee taking place in it. It was now Helgin's turn to roll down once and then again. He bugged out. The knights pursued into the mass of Saxons and I thought, uhoh, they're going to swarm around the flanks if the 1st round goes south, which it did. Luckily the happy thought came to me that the wounded hero could close the gate as the remaining knight pulled back giving a Macdonnell at Hugomont feel to the whole thing.

I was about to call the game at that point. The Pictish heroes were all wounded, they had been repulsed  twice,  the odds of beating the heavily armoured Romans, uphill were low and another squad of Romans had appeared behind the flank of the Pictish javelinmen. But the initiative shifted again. The Picts threw their javelins taking down another Roman uphill meaning they could now be out flanked and then doubled back for a last stand against the new squad. The Romans charged in 3 wide with a +2 advantage to each die and.....were slain to a man!! The rear rank survivor routing. uh oh! DICE! You can't trust them! The fat lady hadn't sung yet!

I sent the main body back in, wounded heroes to the fore.   The shower of javelins did the work and a drawn melee left the Tribune alone, wounded and trying hard to look brave. Luckily the other reinforcements were behind him trying to figure out which way to go and just within command range. He fell back, they came forward and on the next turn the initiative flipped again and they charged with devastating effect just as Sir Bors appeared behind the Picts.

Now the fat lady was singing!

Last charge!

Apart from the few minor points mentioned, the rules worked pretty much as envisaged. The format and vagueness meant that making one-off rulings  for special cases did not require breaking rules, merely improvising. Not a problem for solo games or games between like minded gamers and there are lots of existing rules for those who need a comprehensive and authoritative set. A decision on the 2:1 rule and the benefits of shield wall and spear will follow shortly.

Once again the initiative rule provided lots of uncertainty and opportunities lost and won while the command rules were just enough to throw a minor wrench into things at times. The dice heavy combat also provided lots of suspense, right up to the end. The combat odds could be weighted but never assured and even a great hero puts his life on the line when he wades in.

Prince Michael will be back.


Sunday, August 4, 2013

THE ADVENTURES OF PRINCE MICHAEL: EPISODE 13

EPISODE 13: RUDE AWAKENING


 As dawn approaches, the gates of the town swing open as a small advance guard of Saxons and their allies rush forward. At each gate, 2 of the guards remain loyal. One sounds the alarm while the other rushes to close the gate. Bitter hand to hand combat erupts but at the West Gate, the arrival of Eric Redlegs tips the balance. Without pause, the bold raider leads his elite advance guard deep into the town. The way is open for Helgin, the infamous Saxon leader. Not a soldier of the garrison remains to oppose him.


Suddenly, Helgin finds his blocked! Prince Michael, en route for Belmont had been sleeping at the inn. Awoken by the commotion, he was soon armed and,  calling all able bodied men to follow, rushed to the defence of the town. A terrible blow from the ostler's fists laid one Saxon archer low but without arms and armour it was a hopeless cause and all were soon struck down leaving Michael to meet the powerful Saxon chief sword to sword. Fierce and heavy were Helgin's blows and the young hero was outmatched. Driven almost to his knees, one more blow would finish him and leave the road open. Where was the garrison?


Across town at the South Gate, the loyal guards were swiftly slain and the gate secured but the expected advance guard of Picts was nowhere to be seen. Spurring his horse forward, Dearg Mor soon arrived, a strong force of spearmen at his back. At last the archers emerged from the wood but still reluctant to move, they opened a desultory fire on the catapult crew in their tower. Rushing forward through the streets, Dearg and his men came face to face with Tribune Johan and a handful of soldiers blocking the narrow road where it climbed towards the keep.

Rushing forward, the lightly armed Picts threw themselves against the shield wall, but were held and then driven back. Both Dearg and Buidhe were wounded and paused to draw breathe while their men charged again cover by a shower of javelins from a small party that had passed up the next street. Suddenly, the tramp of hobnailed boots could be heard from the north and a another troop of soldiers appeared behind the javelinmen! The Picts had barely time to turn before these new soldiers were upon them. Four well armoured soldiers against three nearly naked Picts, the result seemed certain but the men of the garrison were barely awake and unused to warfare while the Picts were battle hardened raiders. In a moment three soldiers lay dead and the last one had fled in terror.  Only the Tribune and two soldiers still blocked the road. Riding to the front, Dearg Mor called upon his men to follow him for a third assault up the hill.

To the west, Eric Redlegs' drive into town got as far as the market place where it came up against a tight knot of garrison soldiers, armoured swordsmen to the front, archers behind. Drawing themselves into a tight knot, the Saxons charged. It was over in seconds. Eric took a blow but the soldiers were cut down or fled. The way to loot was open!

Suddenly from behind the Saxons came the thunder of hooves followed by lightning in the form of the swords of Sir Bors and his squire. Driving into the Saxon flank, they cut down Eric and another raider, chasing  the remnants back towards the gate. Spying Helgin's winged helmet, Sir Bors pushed into the mass. Two mighty blows he rained upon that helmet while his squire hewed at the masses. Suddenly the Saxons were falling back through the gate with the knight and squire close upon their heels. 

Outside the gate, the two horsemen were faced by more than a dozen Saxons, rallying now into a tight shield wall. As his squire was swarmed by Saxons and brought down, Sir Bors laid in left and right clearing a space. Behind him came a call, Michael, overcoming his wounds, had staggered to the gate and was pulling the last one shut.  Sir Bors slipped inside as the gate closed. As the bar dropped into place the Saxons began to pummel the stout gate from the other side.


Leaving Michael to hold the gate, Sir Bors galloped towards the South gate whence came sounds of continued battle. The last charge by Dearg Mor had led to a bloody melee and the wounded Tribune had been forced to recoil, left alone to hold the road.  Suddenly the last troop of garrison soldiers appeared at a run. Putting himself at their head the Tribune led them in a charge that swept away the Picts. One thought  took them all, back to the woods and safety!

A close run affair! As the soldiers and townsmen began to clean up and keep watch, young Michael was urged back to the inn where the inn keeper's daughter showed her appreciation by shy glances and soft smiles as she began to tend his wounds.
_________________________________________________________________

Tomorrow, a more technical look at the game.

Saturday, August 3, 2013

Last Minute Arrivals

Eric the Redleg and another band of bloodthirsty raiders joins Helgin's host.

One might notice one rather large and old fashioned Celt joining in, a sample from Irregular received almost a decade ago when I ordered some ECW Scots. I stumbled on him today and thought "close enough, time to join in lad".

When I was putting the rules together, I had originally intended to base combat on groups of 4 as in Rattle. I stumbled over heroes though who were being given 1 die per power. Worked great in mass combat but in duels, both sides suffered too much. I contemplated a different mechanism but opted to go for MacDuff style combat instead which had been a close 2nd choice anyway. However, along the way I lost my shieldwall rule and thus any advantage for heavy infantry in formation. I had thought about closer basing for heavies but my own figures are all based the same. Since the slow speed of even unarmed heavy infantry is meant to reflect their close formation, I think I will just give them the same +1 that the HC get, but only to the front and not in bad going.

I'm also uneasy about the lack of an evade rule since I'm used to having one but Charge doesn't have one so I'm going to stick to my guns and try it.

It also occurred to me that one needs to make allowances for Bishop Germanius and the Hallelujah chorus. In essence priest will need to be treated as magicians but without spells, just prayers, preaching and of course, loud choruses of Hallelujah to frighten the enemy.

Tomorrow, Game On!